Welcome to my TREENUT.NET Web Site.
Here are a few of the things that I've been working on lately:
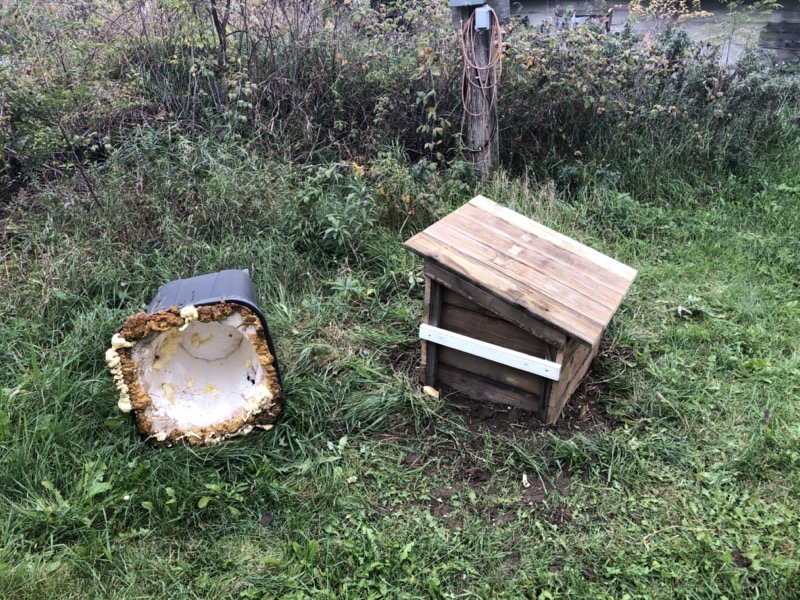
December 2023: A Christmas "Present" from ths Gas Company.
.jpeg)
You can't beat corporate money.
They do this because they can. Whether it makes sense or not.
For more of this story [click HERE]
Summer 2023: A beautiful fall sunrise.
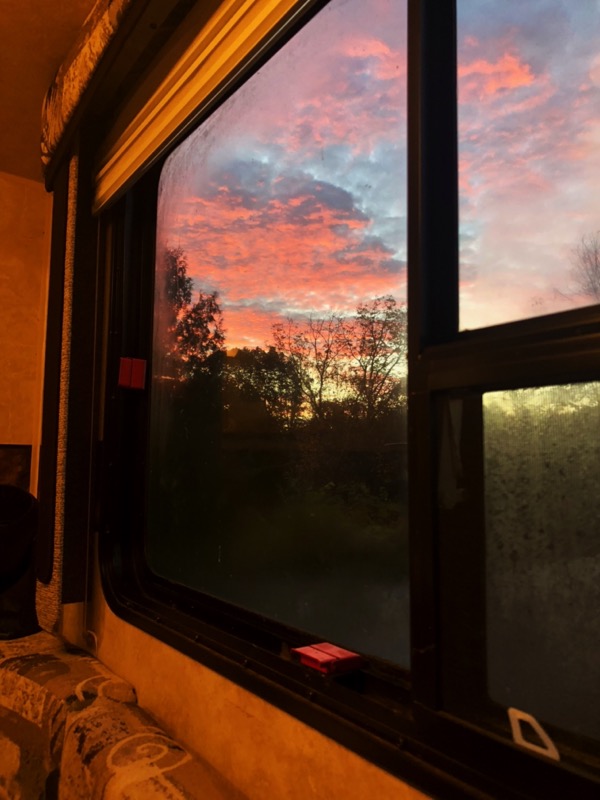
10/24/2023 7:24 AM
Sometimes you just need to stop and smell the roses --
-- or enjoy the sunrise.
September 2023: Begin work on new forest plan.
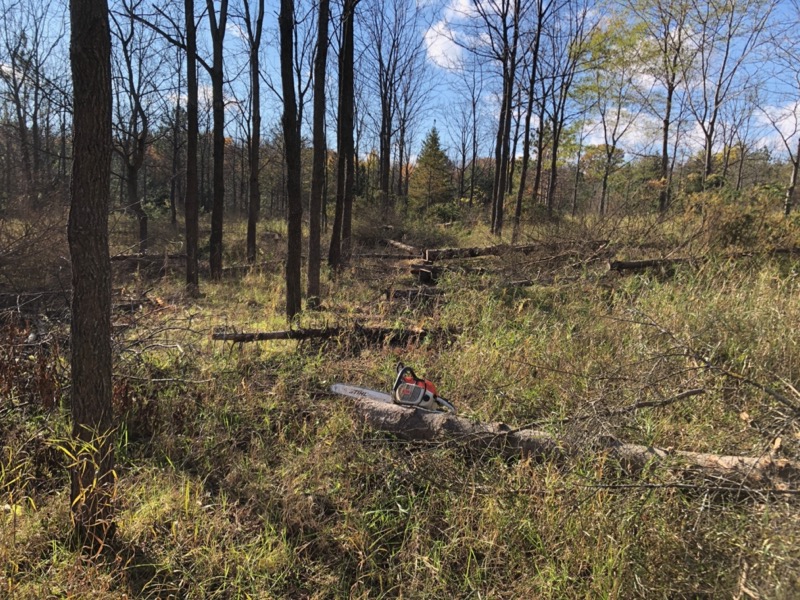
Release of Black Walnut.
The new (revised) forest plan calls for removing pine from the Black Walnut stand where it is directly competing with a Walnut tree -- either at the root level or at the canopy.
At this point the pine have served their purpose as nurse trees and now they are slowing the growth of the Walnut.
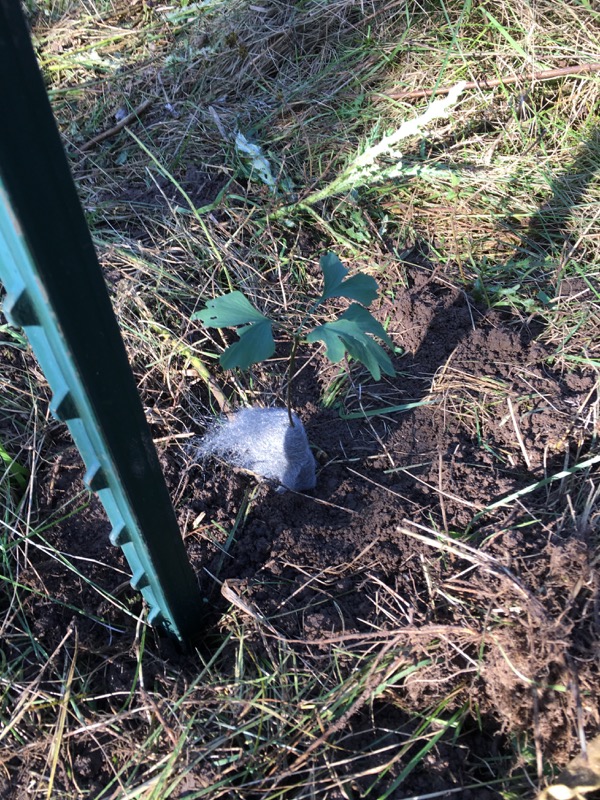
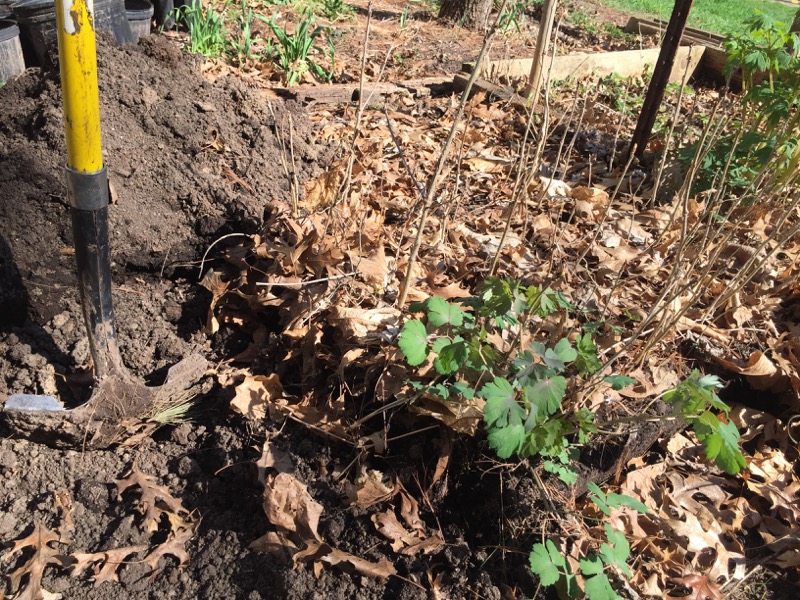
June 2023: Release new transplants.

Brush clearing operation
Cut all the underbrush that overshadowed the new transplants like Raspberry, Elderberry, Virginia Creeper, Grape. Clear out saplings of Box Elder, Cherry, Ash...
But, of course, the first task is to FIND the new transplants under all the new foliage.
This picture shows the condition of the brush when the transplants were planted in early May. The area looks quite open but by the time I visited the woods again in June, the leaves had all expanded and the new transplants were completely over topped (and some were in virual darkness).
If I hadn't cleared this area I would have lost a ton of these new trees. Clearing this small area took me three days of back-breaking work with a chainsaw and a brush cutter.
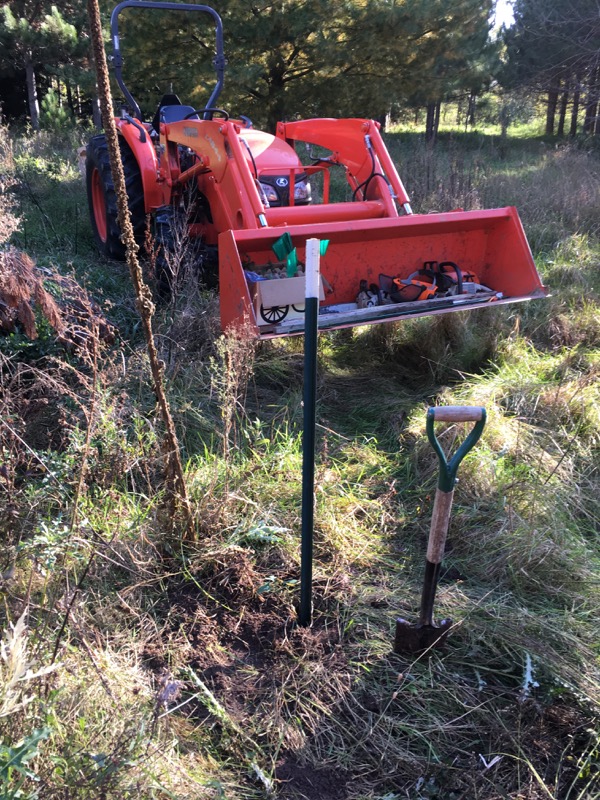
May 2023: Transplant Pine and Spruce.
Spring transplant order from DNR: 200 Red Pine; 200 White Spruce. I ended up planting all these alone this year.
Most were planted in the old windbreak to re-establish that forest after blow-down.
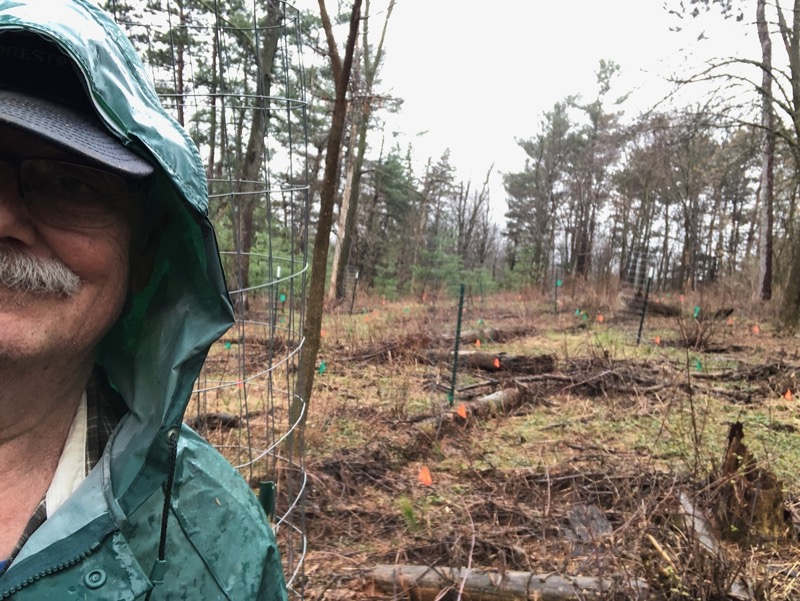
Planted row looking west.
Rainy weather is great for the new transplants -- but not so great for the transplanter.
Click on picture to enlarge and you will see:
- Rows of orange flags showing this years' transplants.
- Green flags showing last years' transplants that have survived.
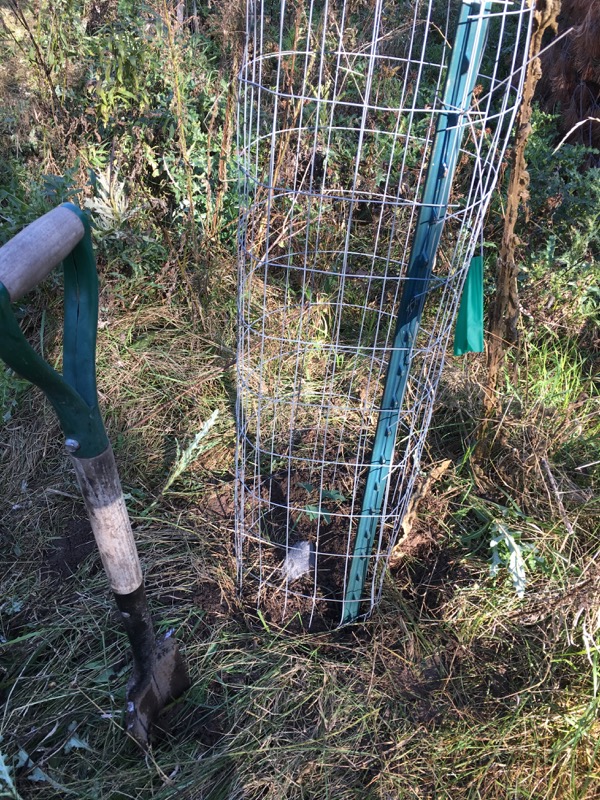
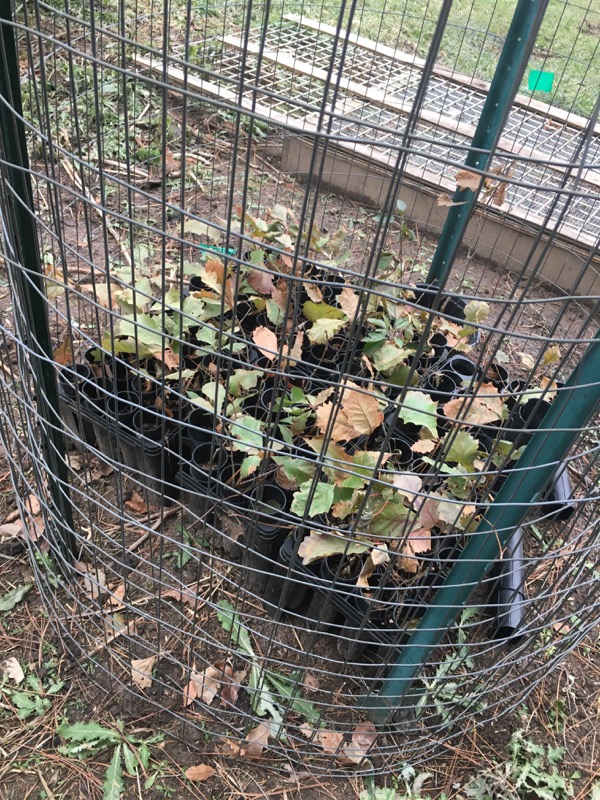
- Fenced in cages protecting Oak transplants from last year.
- Oh, and that's me - a little wet and a little worn.
For more about this effort [click HERE]
April 2023: Tree Nursery
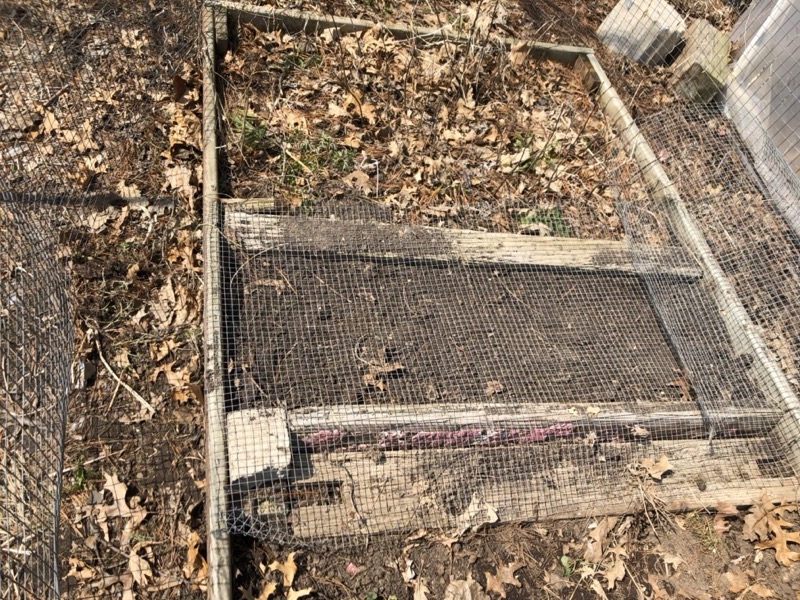
Annual Tree Nursery rotations
Right: Nursery bed containing seedlings [top section] White Oak from 2020 seed. These will be dug this week and transplanted at the farm. [middle section] Red Oak acorns collected last fall (2022) and spread under a screen this month.
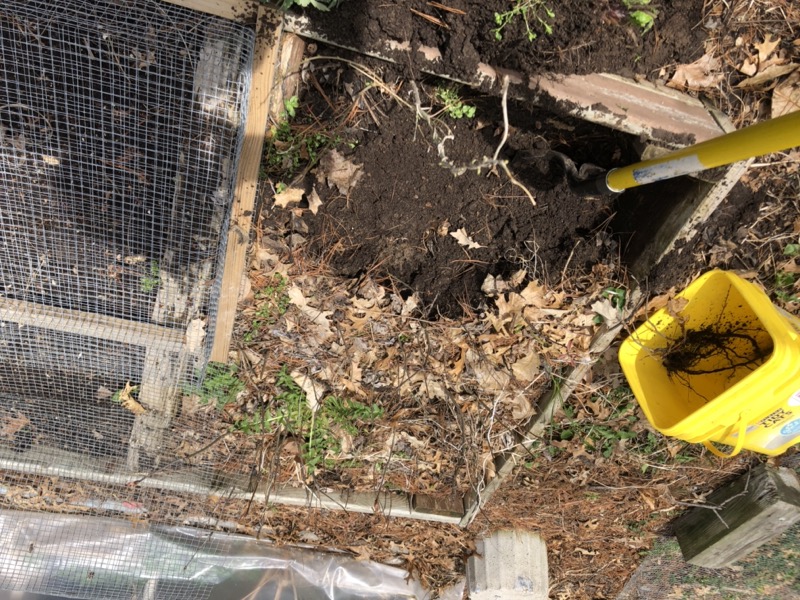
Lifting 3-year Oak seedlings
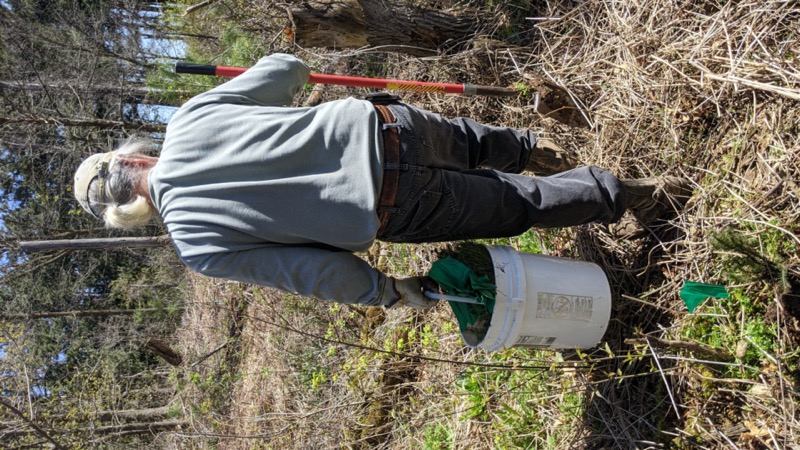
This has been a cool spring but these seedlings are starting to bud break so I need to get them out of the ground. I don't want them to sit in a bed for another season.
I found around 50 seedlings in this section. I packed their roots in wet leaves in this bucket. I will keep them in a cool garage; loosly covered with a garbage bag -- for 4 days when I am heading to the farm to transplant 400 evergreen seedlings arriving from the DNR nursery.
For more about this transplantation: [click HERE]
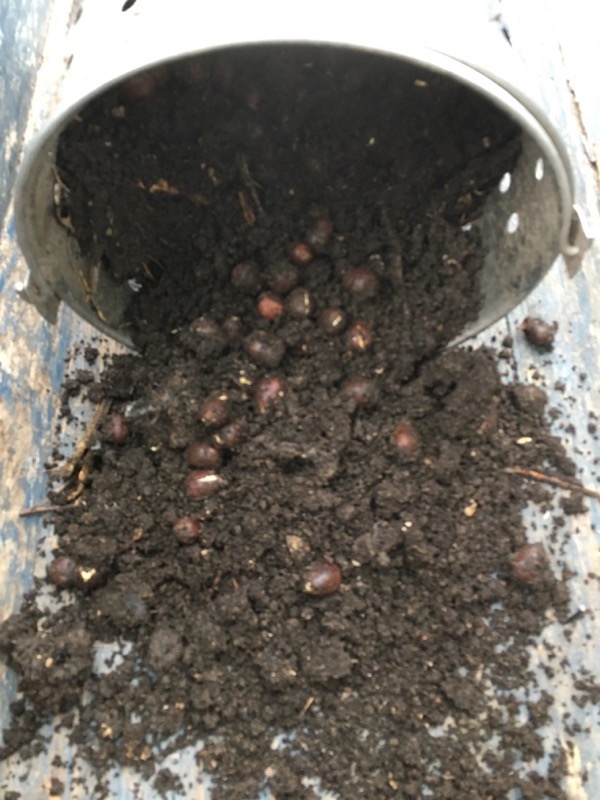
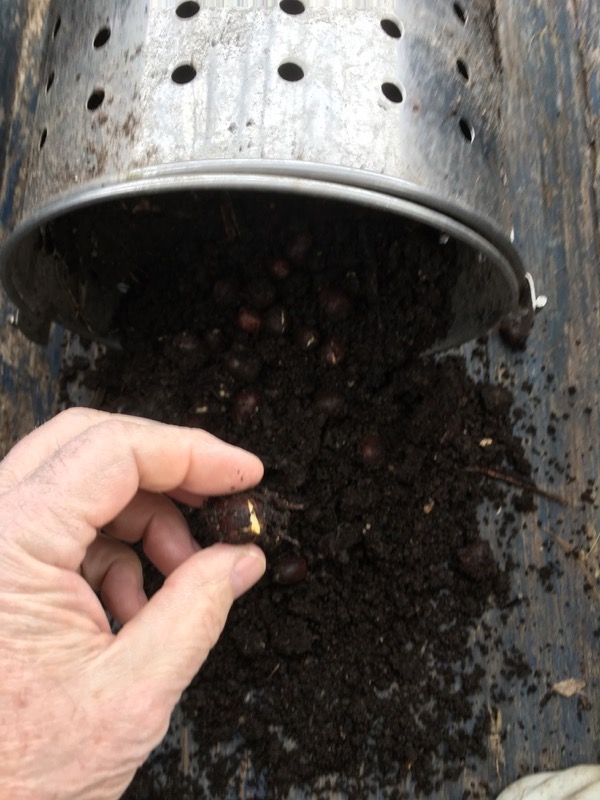
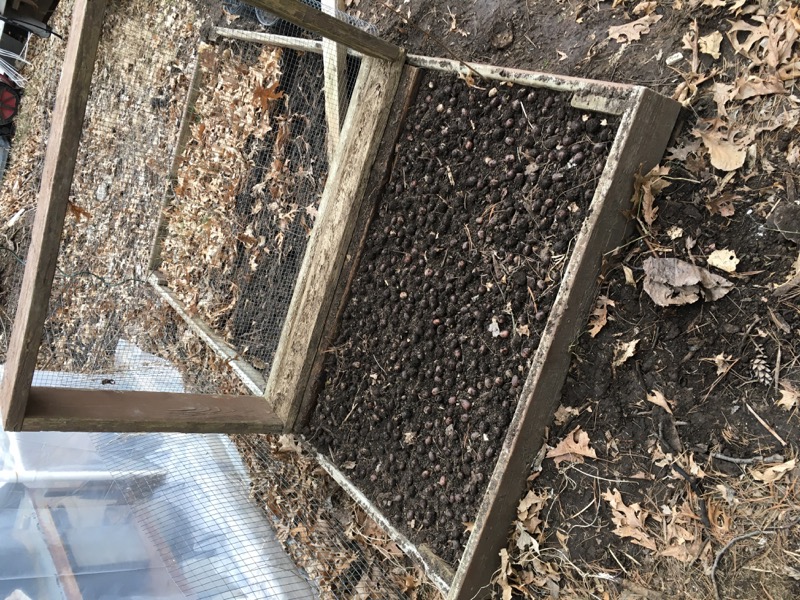
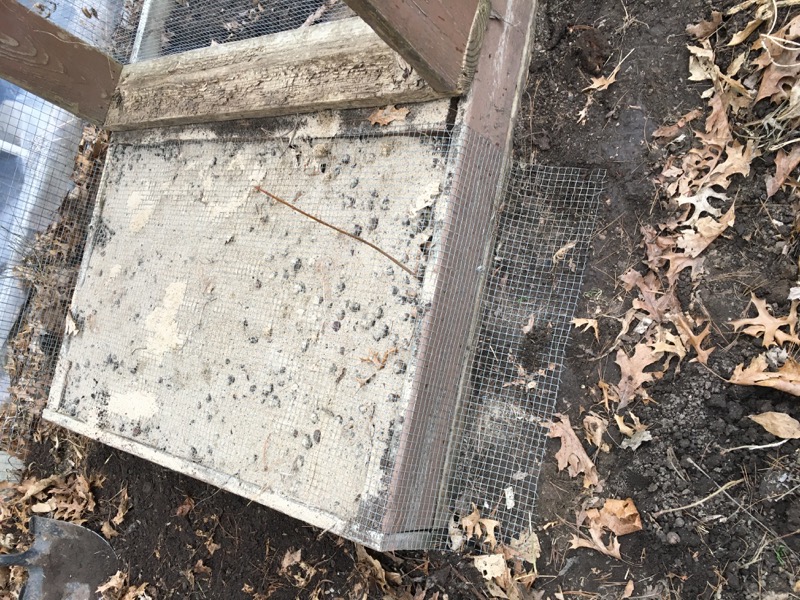
Starting Red Oak Acorns
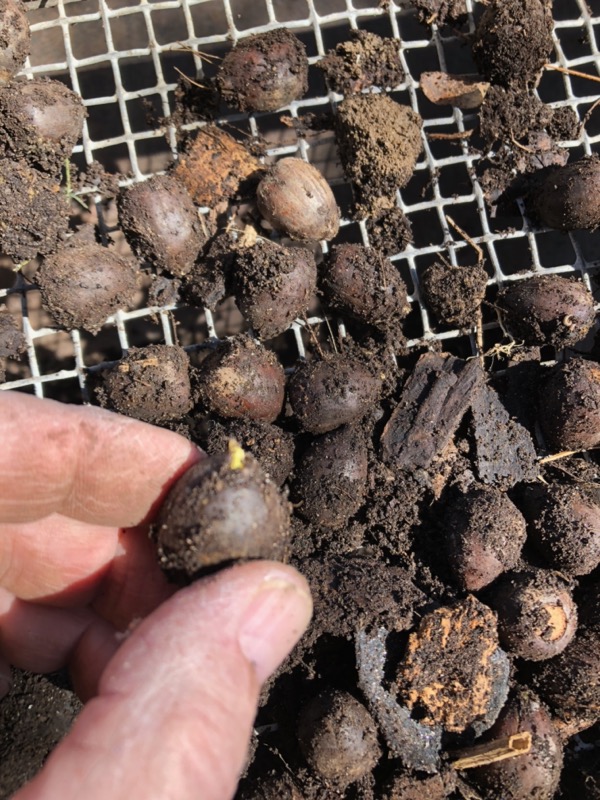
Acorns collected in the fall of 2022 at Warner Park.
Over-wintered in a bucket buried in my compost pile (to protect from the squirrels and mice)
I have carefully planted each of these acorns into (80) D40 tree pots and enclosed these pots in a screened-in frame. These have prospered during the summer of 2023 and we will see if I can get them to survive the winter.
For the rest of this story -- and latest update [click HERE]
Spring 2023: Managed Forest Law contract renewal.
A portion of our farm was enrolled in the MFL program for 20 years. This contract will expire this year so we had to hire a consultant to write a new Management Plan for that portion -- the DNR no longer provides this service.
Our current plan calls for a thinning to happen in the next couple years. But after walking the woods the consultant concluded that our trees weren't big enough for loggers to be interrested in doing a thinning. So our new management plan pushes this requirement back 10 years until we can consistently get at least three sticks out of each tree.
Shortly after the new plan was submitted and approved, the DNR MFL specialist joined me for a walk through the plantation. According to him, there are no longer any logging companies that will come into a small plantation (~80 acres) to do thinning. This means that the DNR has been forced to modify the thinning requirement and now it will fall on me to do any thinning. And because of this, the determination as to which specific trees need to be removed will be more in my hands.
This is good news because in the past I have had terrible experiences with loggers working in my woods. And the design of my woodlot has hardwood trees mixed in with - and surrounded by -- softwood "nurse" trees.
Conclusion (a new paradigm):
In the past, we were not allowed to do thinning because it was distroying marketable trees; the state gets a cut of the profits from an MFL timber sale. Now we are simply requred to do "timber stand improvement" as needed. Since basically there is no way we can sell our timber stumpage, there is no loss to the state if we drop a few and let them rot (which, of course, builds up the soil for the remaining trees).
More: [click here]
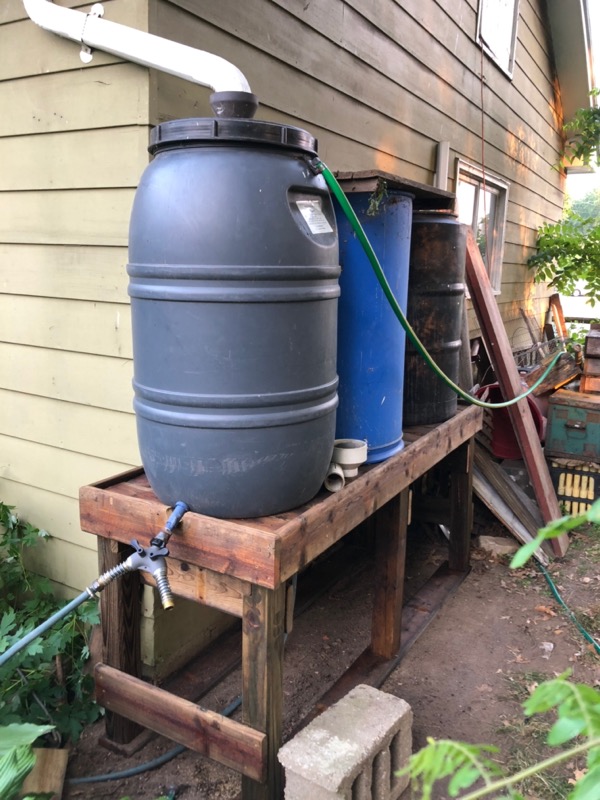
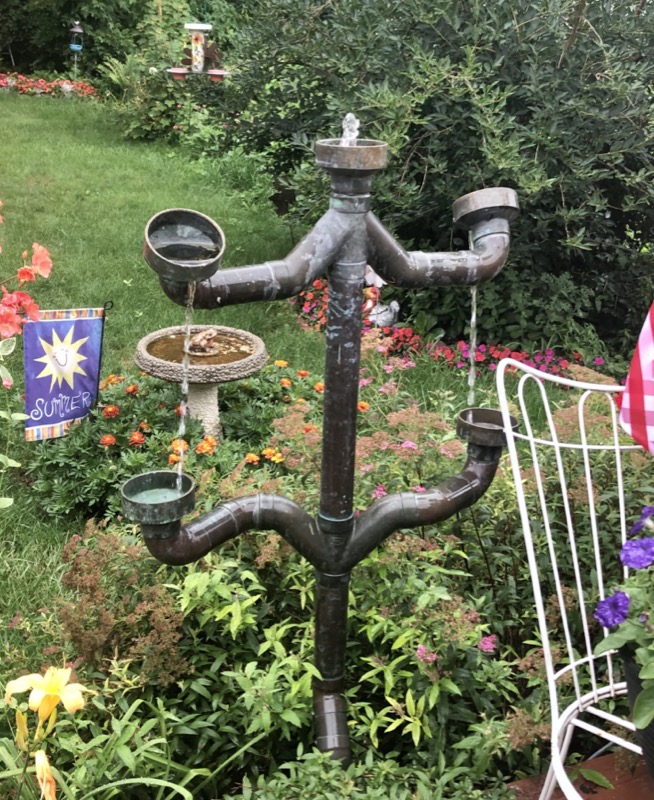
Spring 2023: Rain Barrel Support Stand Made From Recycled Lumber.
I scrounged another rainbarrel from the curb so I needed to extend my support system. I had been using concreet blocks under each barrel and this was both flimsy and ugly.
I also scrounged some 4X4 treated posts from the curb -- a neighbor was replacing an old fence -- which were in good shape above where they had been in the ground. I used 6 of these 4X4's and a few old deck boards to make this stand.
For more about this rain barrel; and other projects using recycled lumber: [click HERE]
March 2023: Wall Plaques
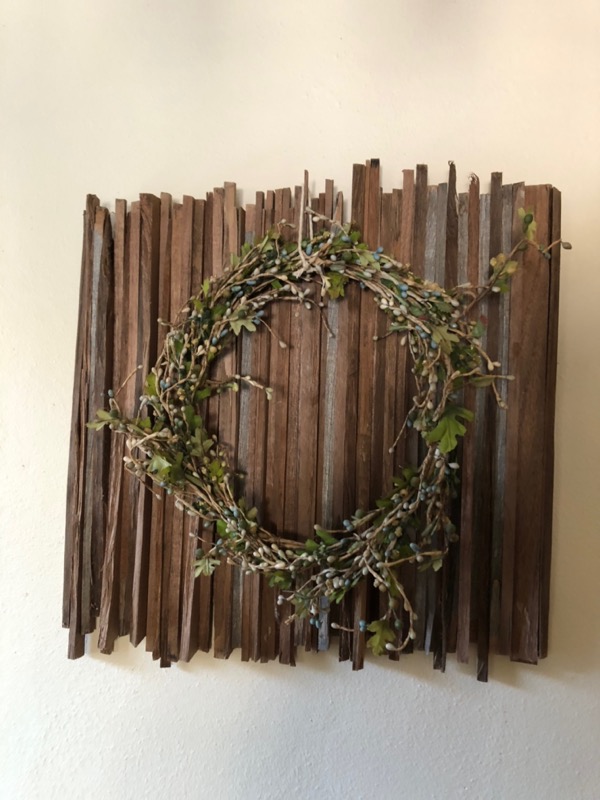
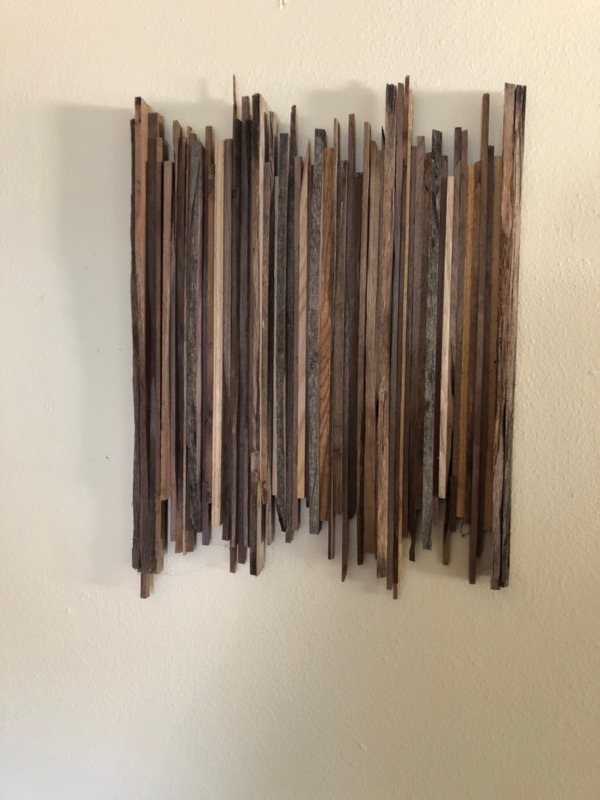
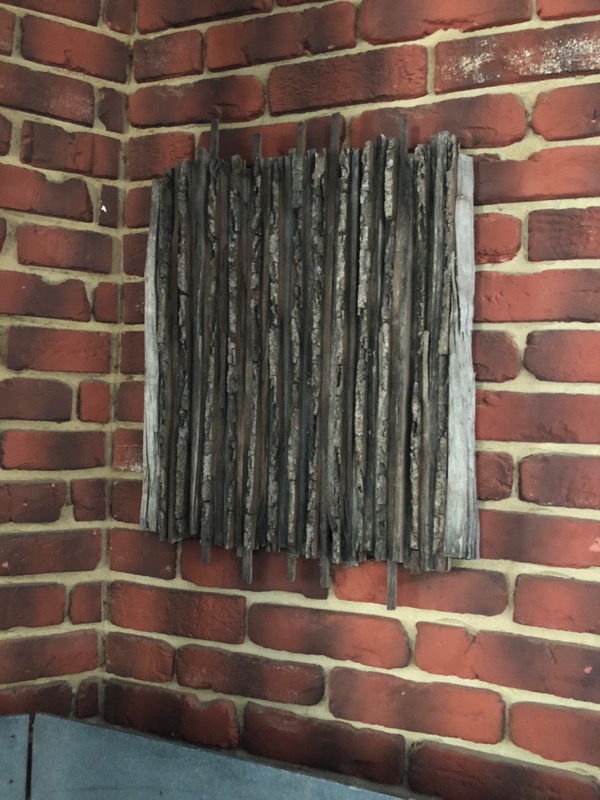
I put these plaques together over the past 3 years. For more information [click here]
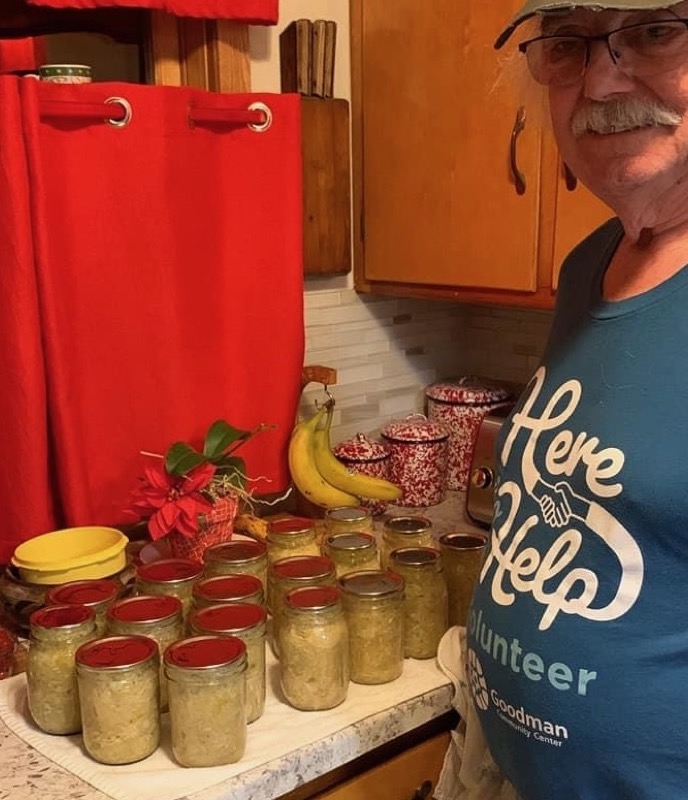
October 2022: Sauerkraut
This year's batch of Kraut.
We are nearly out of the 2020 batch so it's time to shred up another batch of cabbage.
- Slice Cabbage head in half and remove stem (center core)
- Shred with kraut shredder
- Add to balance scale until you have 5 lbs.
- Dump into clean pickle pail and add pickling salt (3 tbsp.)
- Mash with baseball bat stomper
- >>> Repeat Above Sequence <<<
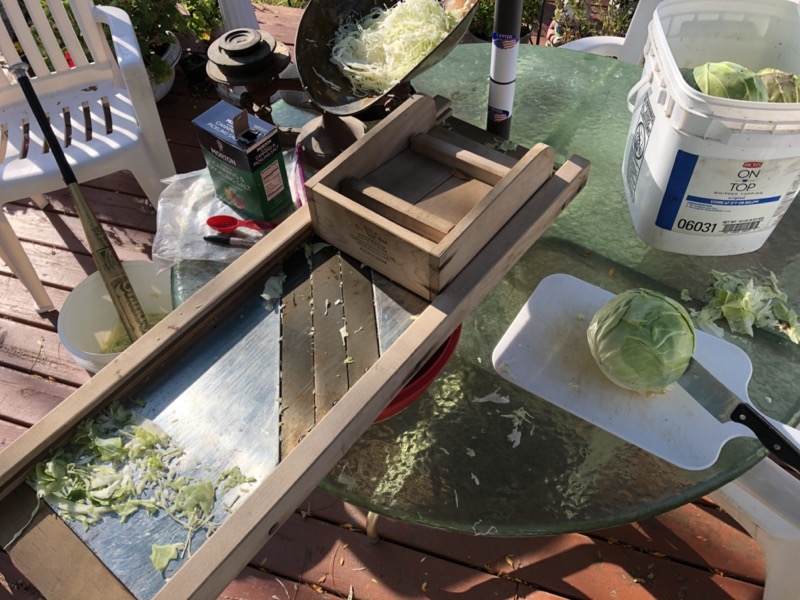
20 # of cabbage ready to ferment.
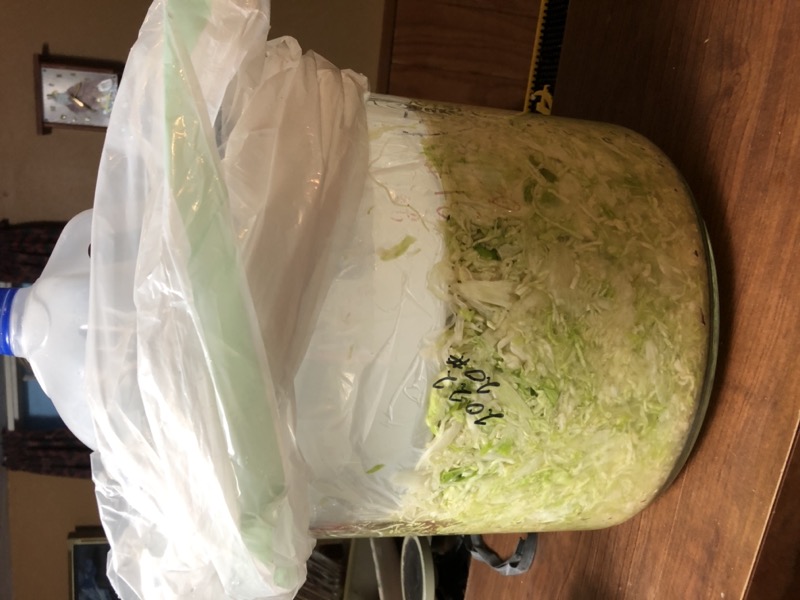
Cabbage and salt are mixed and packed tightly into this crock.
A garbage bag is laid on top and a plate is laid on top of the cabbage to hold the cabbage down evenly.
Add water inside the bag -- enough to force the bag against the side of the crock to provide an air lock.
Center a jug of water to provide weight because when the fermentation starts, CO2 will be given off and will lift the cabbage above the liquid brine.
Finally, I fold the plastic bag over the top of the crock and add an elastic band around the top to further seal out any air from entering the crock.
After a couple months, the fermenting will be finished and the kraut will be ready to can (or freeze) .
Click on images to enlarge.December 31, 2020; Canned 20 pints.
The top inch or so was starting to loose it's bright yellow/green color so I decided it was done fermenting.
- Remove the weights and the two bags holding the water. The top of the Kraut was a little darker color but there was no sign of any 'off' growth and it tasted great.
- I think the reason it turned color was that the liquid had gone down about a month into the ferment. I added more weight to the top which brought it back up.
- I pealed this top layer (about 1/2 inch) and set it aside -- only about a pint's worth.
- Sterilized pint jars and lids, filled with kraut and packed tight to bring up juice to withing 1/2 inch of top.
- Back in water bath -- bring to boil -- boil for 10 minutes -- remove and make sure lids are tight. Then listen for them to pop
NOTE: I remember my mother used to put a slice of raw potato on top of each jar before putting on the lid. I don't remember why.
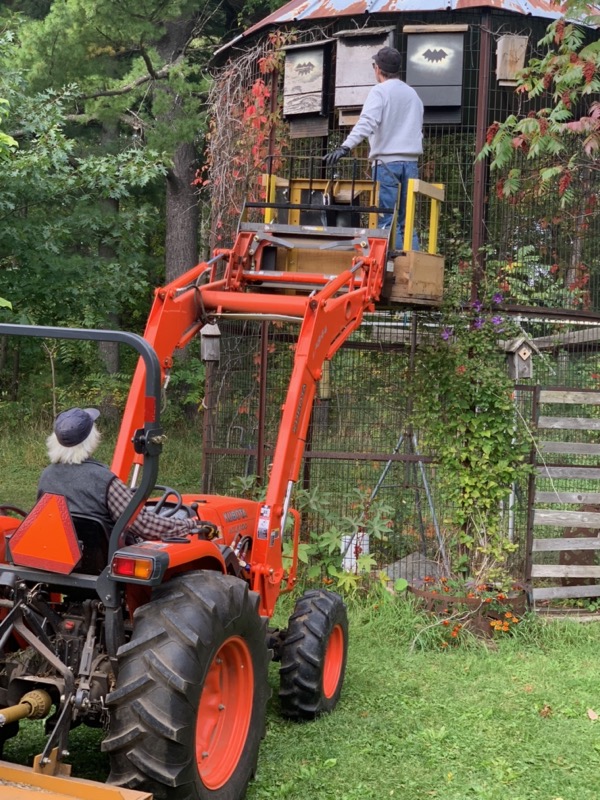
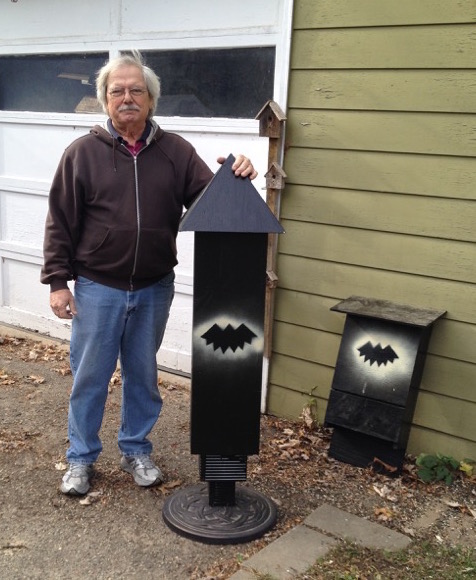
September 2022: More Bat Houses
Making room for more bats next year.
Lance and I hung the refurbished bat houses on the corn crib. We rearranged the existing houses a bit.
Now there are a total of 6 bat houses of various vintage, hanging on this crib and ready for bats to move in next spring.
Also note the new man carrier mounted on the tractor forks. This unit is designed to mount either on the front or the rear of the tractor.
Click on images to enlarge.Click here for more info about the reconditioning of these bat houses ...
August 2022: Bat House update:
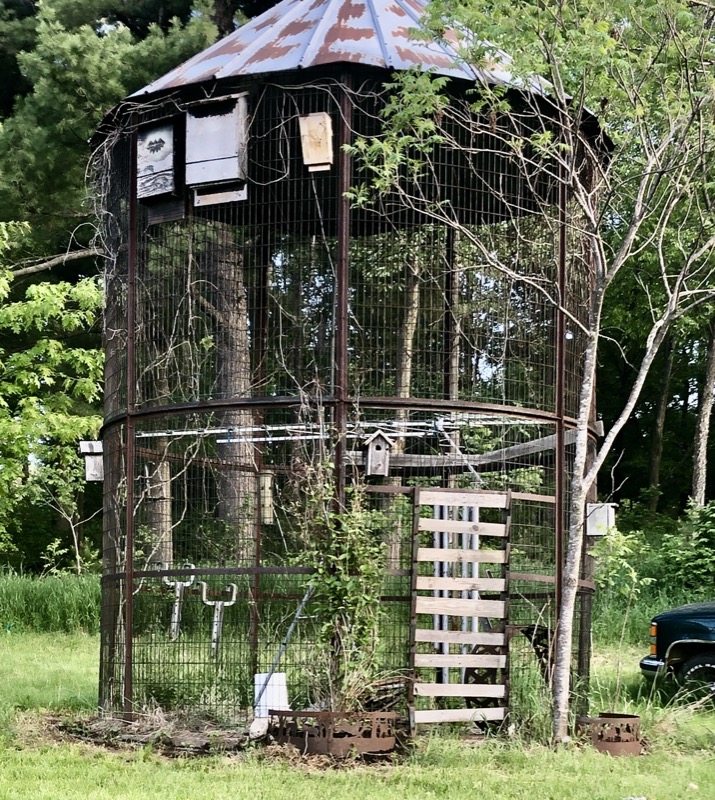
The Bats Return.
Late last fall (2021) we removed all but one of the bat houses mounted on this corn crib -- four of the old houses needed repairs. One was still in pretty good shape and remains -- the largest house in the picture.
The smaller house on the left I built two years ago and I had it hung behind the Sumac tree on the right. I think it was gettig too much shade and hadn't attracted any bats so I moved it to it's new location (on the left in the picture).
Click on images to enlarge
We counted 50 bats.
On the evenings of August 3 and August 4, we counted 50 bats from the 'new' house on the left. We're pretty sure a few came from the middle house as well.
The small house on the right is a from a kit and it's only been up one season. This may not be enough time for the bats to accept it.
This was the first time in many years that we've seen bats in these houses. I was beginning to fear that bats were no longer around so it was a great relief to see them.
Click on video to the right to watch bats fly out.
October 2021: Packing up the farm for the winter:
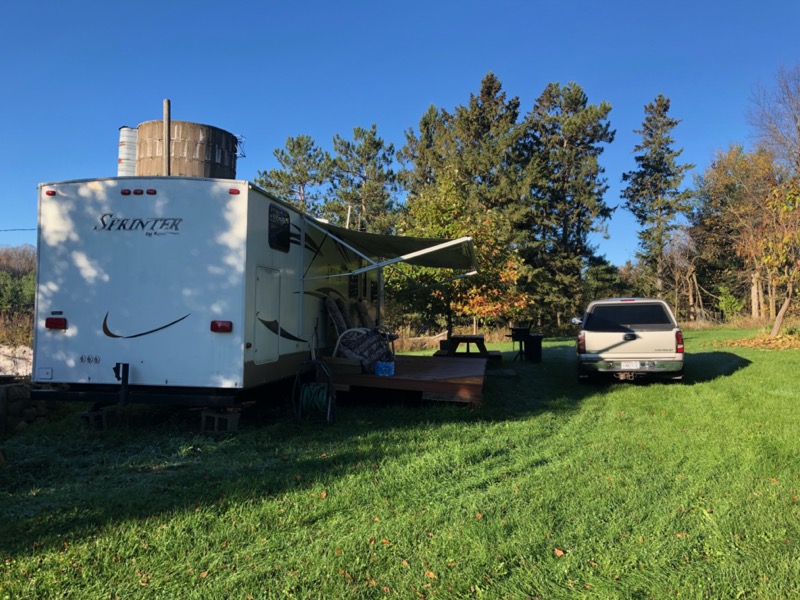
Preparing for winter - again.
First hard frost of the season hit here last night so it's time to winterize the camper and move it back into the shed for the winter. First I have to lift the deck and set it on an old hay wagon for the trip into the shed.
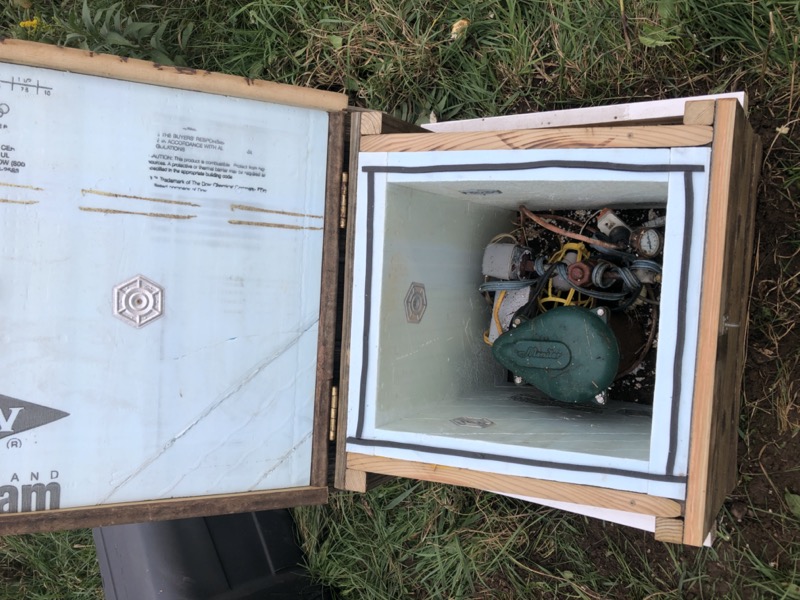
Below: The old and the new well shelter and a view of shelter installed over well.
For many years I've wanted to replace the shelter that covers the well and protects the pressure switches from freezing. This year I did it.
Click on images to enlarge
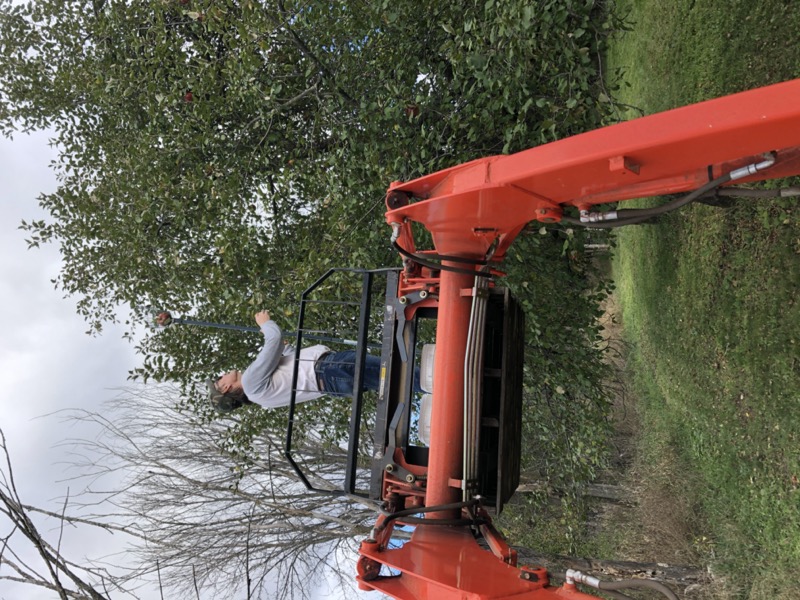
Harvesting the last of the apples.
This was a good year for apples. Here Lance is picking the last of the Big Ben apples from the 'mother tree'. His Grandmother planted this tree from a seed and it grew into that very rare successful new apple variety. But that's story for another time and place.
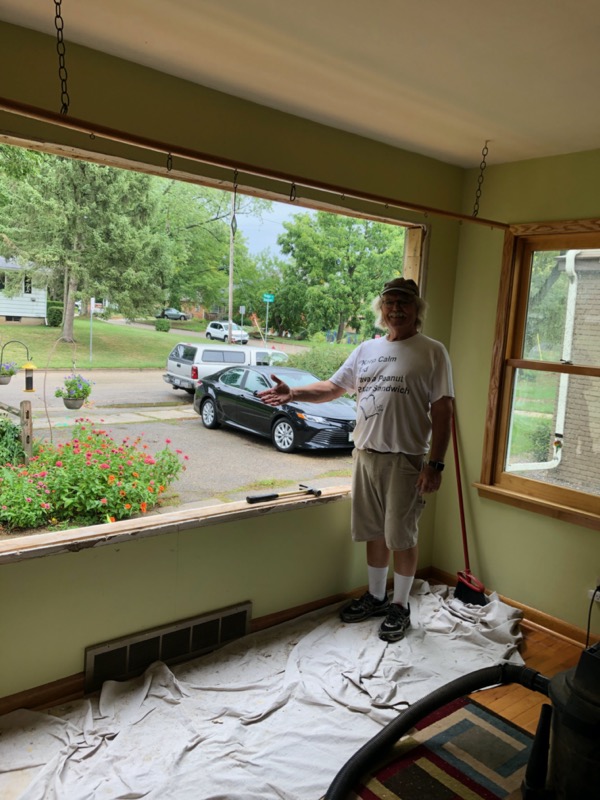
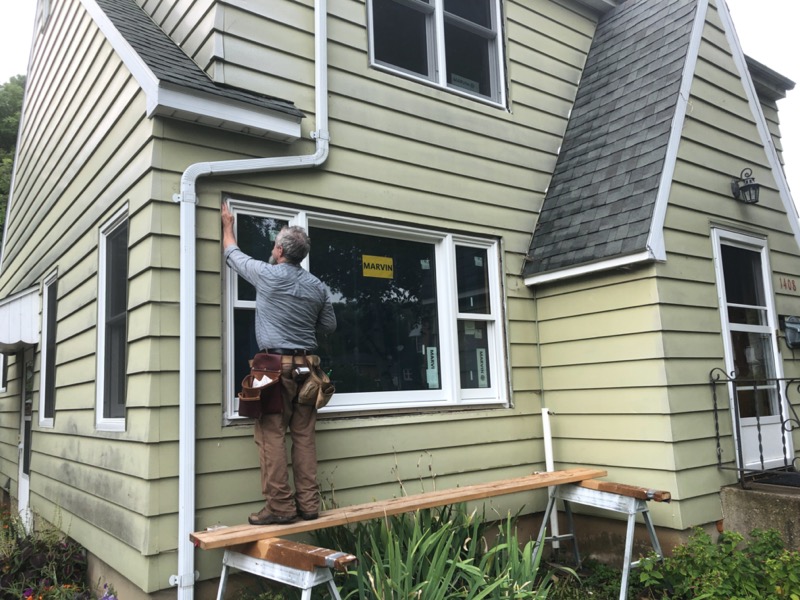
September 2021: Replacing old windows for the upstairs and front picture window:

New Marvin Ultimate solid wood windows.
This was quite a project but it ended up going very smoothly; thanks to some very good help.
Three years ago we replaced the downstairs windows and we liked them so much that we decided to replace the upstairs windows next.
This house was built in 1952 but the upstairs was expanded 20 years later. So these windows were much newer than the last batch (except for one). Even so, the wood trim on the inside was badly water stained and deteriorating. And the outside needed to be scraped and painted every couple years, so it was time ...
Click on images to enlarge
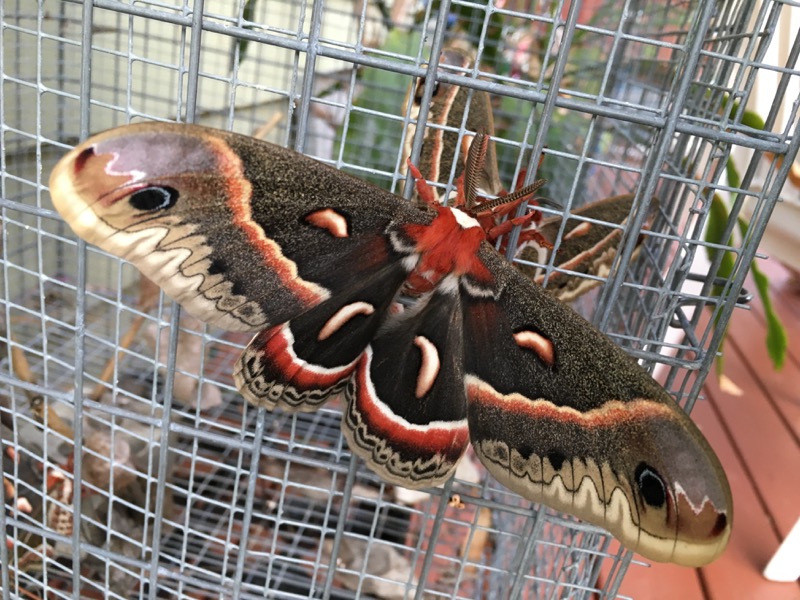
August 2021: Cecropia Moths Spin up for the winter:
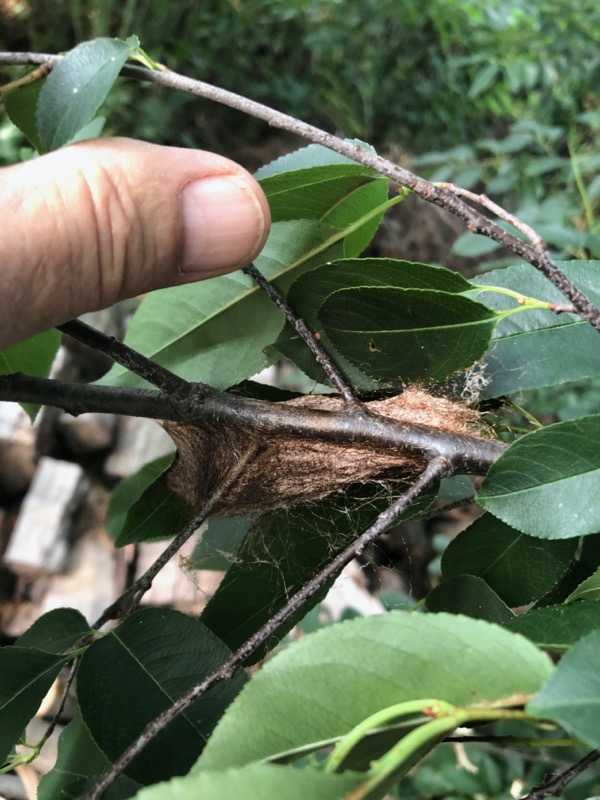
August 11, 2021 Cecropia have spun up for winter (three out of four).
The 2021 season for Cecropia has been marked by warm, dry weather. I think this is why they have spun up their cocoons a little early (except for one).
I have raised my caterpillars (cats) exclusevely on Black Cherry this year. The Black Walnut in my back yard have gotten too tall.
Left: Newly spun-up cocoon on black cherry.
Lower Left: I ran out of leaves on the lower branches of this black cherry tree so I had to climb on my wood pile to relocate the bags. I'm glad this was the last time I had to move these.
Bottom right: Another coccon along with the one remaining caterpiller (arrow shows its feet holding on to the branch).
Click on images to enlarge
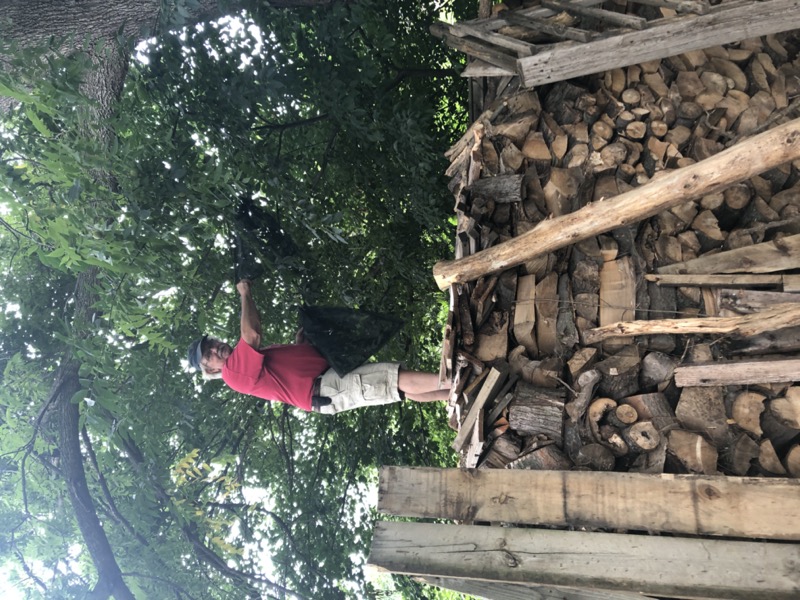
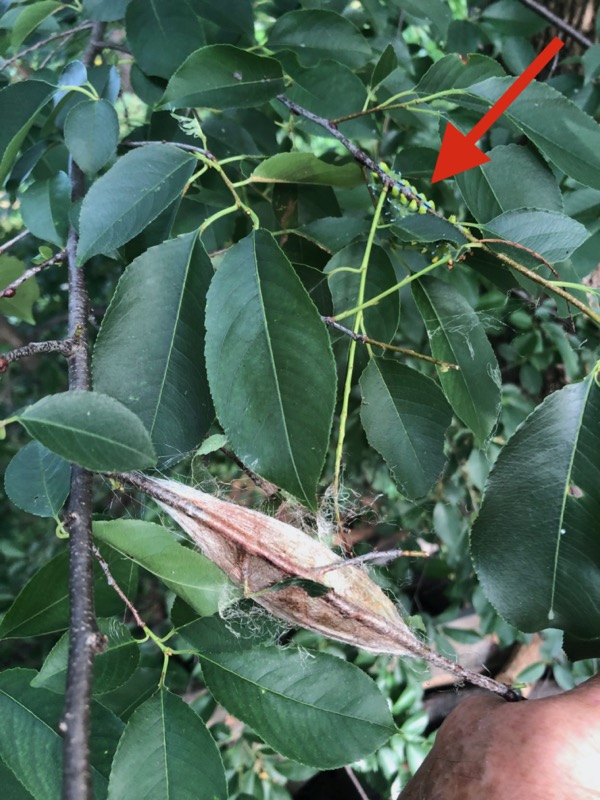
And one cat still eating (upper right)
June 2021: Rain Barrels, etc.:

Adding Rain Barrels to water deck plants and supply water for fountain.
I picked up a bunch of used deck lumber from my neighbor and put some of it to use in building this stand for a 'new' rain barrel. My existing rain barrels are behind the garage and require a fairly long hose to reach the deck.
The new barrel is next to the deck and mounted higher to give a faster flow for watering the pots located on the deck. It is also close enough to the fountain to run a short hose to a float valve on the resevoir to keep the fountain from running dry on windy days.
Note: overflow on barrel is from old washing machine -- this bigger hose is needed to handle overflow because I have no bypass on the gutter downspout.

[Click to enlarge]
May 2021: More tree planting:
Second round of re-establishing evergreens in blow-down forest.
In 2018 I planted 300 Pine and Spruce in the area north of the farmstead that we call 'The Windbreak'. This area was once a thriving windbreak but after some questionable logging practices and a couple good wind storm it has been reduced to a haven for underbrush and weeds. A good number of the trees I planted in 2018 have survived and many have even trived so I have order 300 more to hopefully add to the success.
100 Red Pine and 200 White Spruce (3-year) seedlings arrived on April 31 from the DNR (Griffith Nursery in Wisconsin Rapids). Lance and I planted these after having cleared much of the brush in the area in early April.
Click on image to enlarge
April and May 2021: First try at grafting apple trees
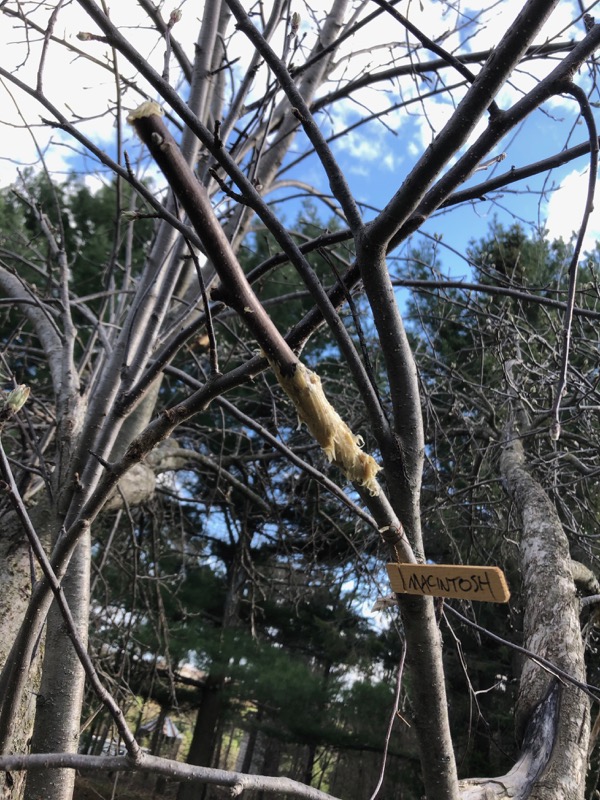
Let's give this a try
I've never tried grafting apple trees. So far I've just been planting seeds to see what I come up with. This spring I thought I should give grafting a try.
I wandered over to my neighbor's -- we get Macintosh apples from him every fall -- and cut a bundle of 1st year water shoots from his trees.
Lance and I added grafting to our list of projects when we drove up to the farm to clear brush in April.
Click on image to enlarge
March 2021: What happened to the oak seedlings?
Another lesson learned the hard way ...
Remember last April? I dug (lifted) about a hundred Oak seedlings from my nursery? I put these in pots because I couldn't make it to the woods to plant. Remember?
I nursed these potted trees through the summer and they all did very well. But I have learned that I can't leave these potted trees unprotected over winter or they will freeze out. In the past I have just laid the pots (and trees) in a pile and covered with dirt from my compost pile. This has protected them from the severe temperature shifts in our winters.
This spring, when I dug them out of the compost, nearly all the pots had been gutted by a mouse. All but a few (shown in the background of this picture) had been eaten -- roots and all.
I really had no idea that a mouse would go to all this trouble for such a small meal. But I'm pretty sure it was a mouse because she came out of the compost and mocked me while I was stacking my empty pots.
Click on image to enlarge
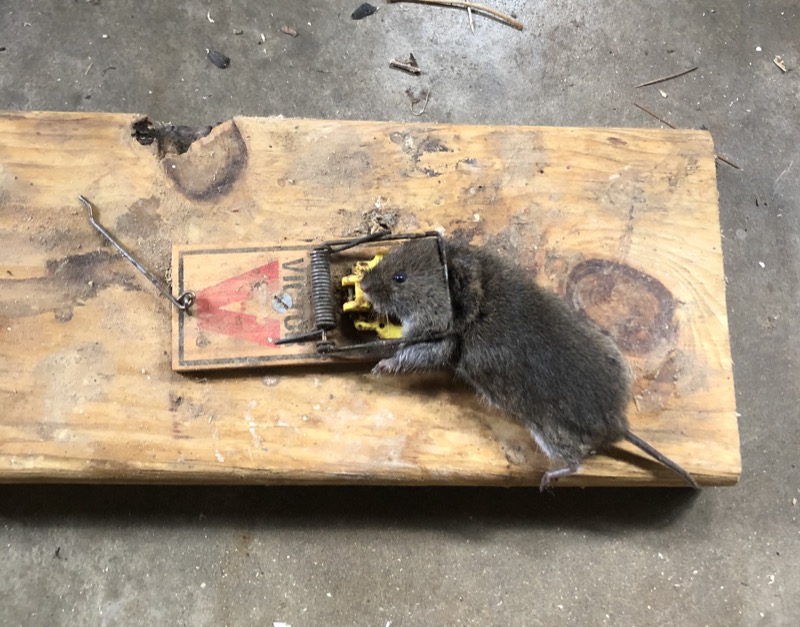
Got em !!
Here's the mouse that ate my trees. This is small satisfaction for the damage done. But it is what it is. It must have been hungry now that all my trees were gone so it wandered into the garage where I have all the traps set.
Click on image to enlarge
March 2021: New Seeds for the Garden(s)
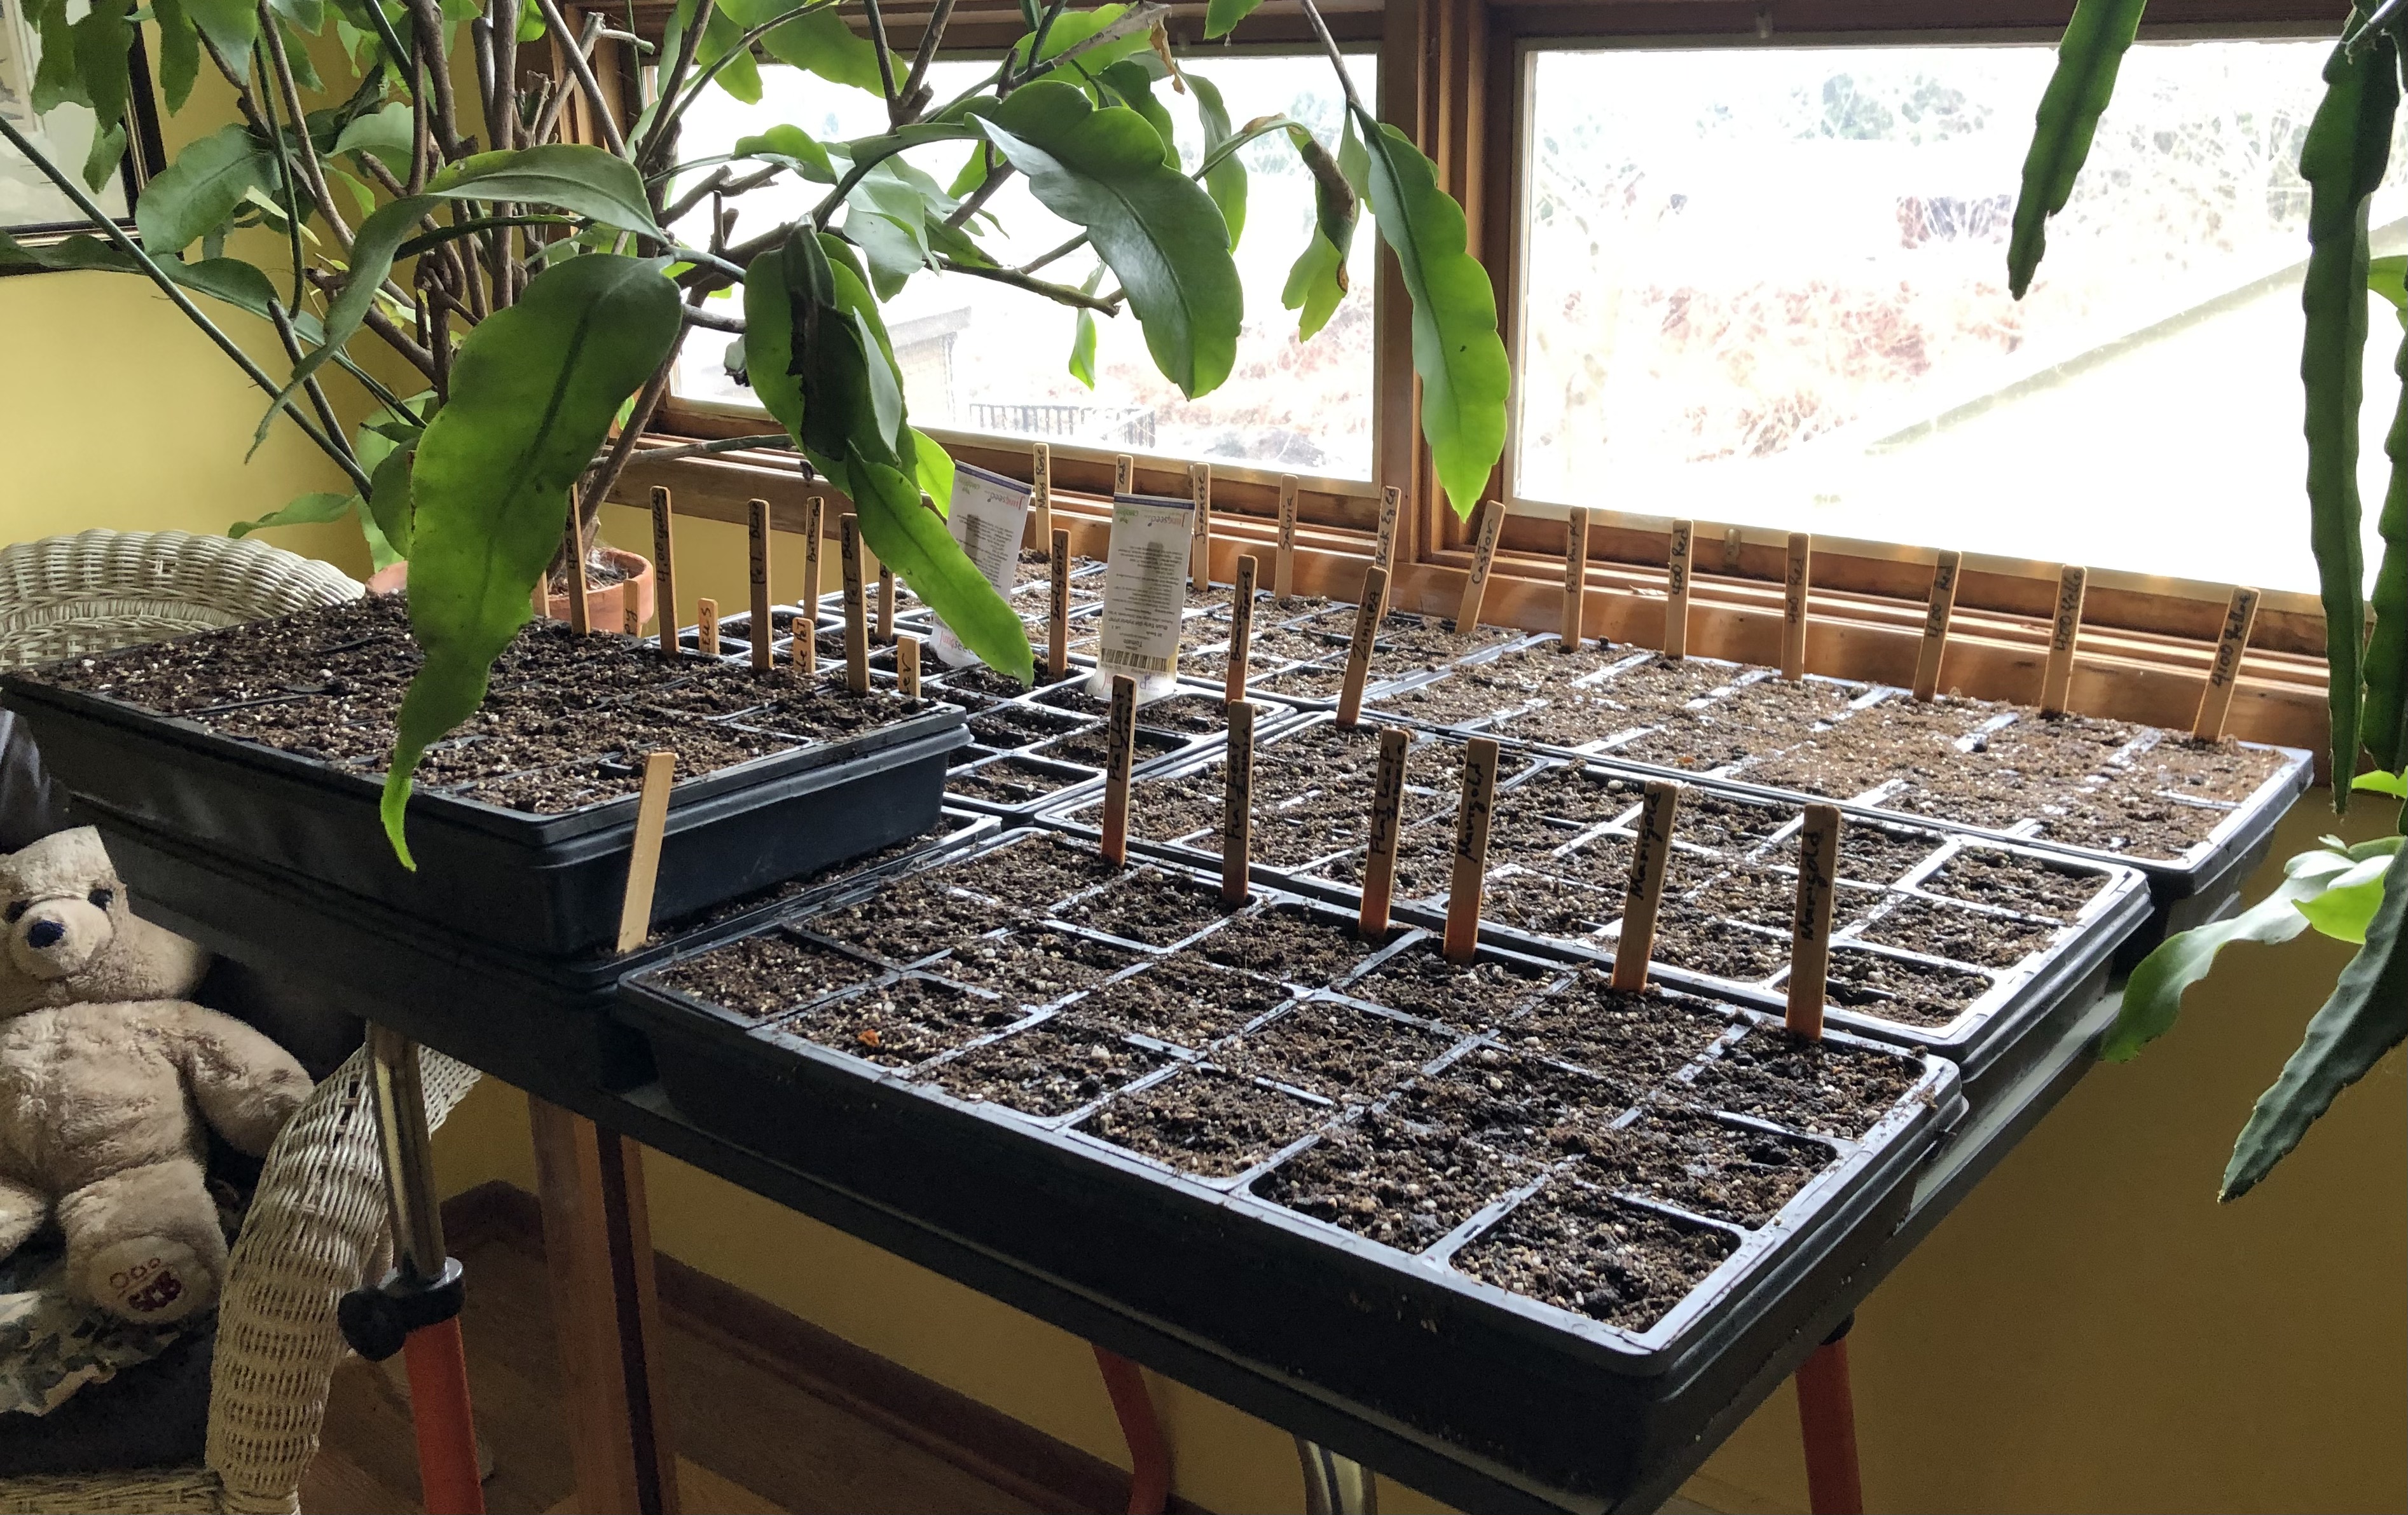
There's no seed shortage here
But where will I ever put all these plants if they all grow. I need a bigger yard.
Click on image to enlarge
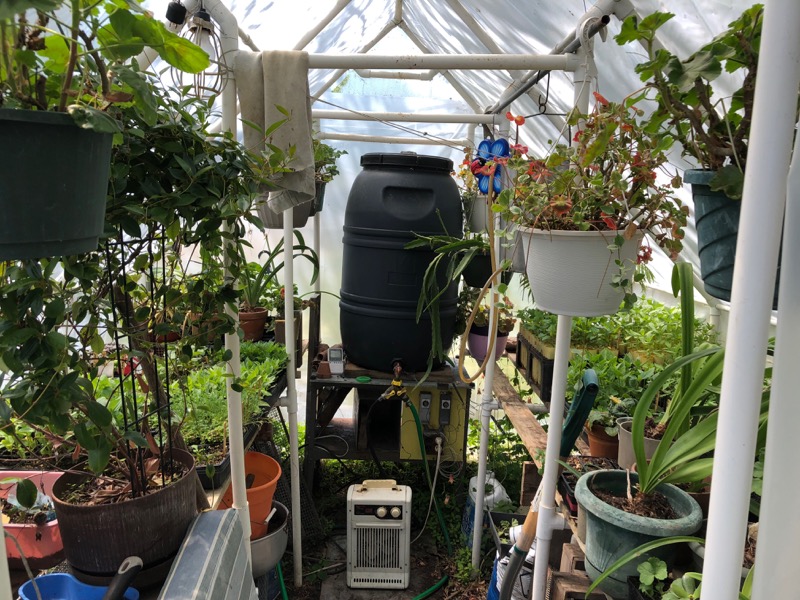
May 2021: It's been a good growing season, so far
The weather has cooperated with the greenhouse this spring. No hard frosts that force me to move things inside (force me to run heaters in the greenhouse).
Click on image to enlarge
December 2020: Finally figured out what's wrong with my Fender Amp.
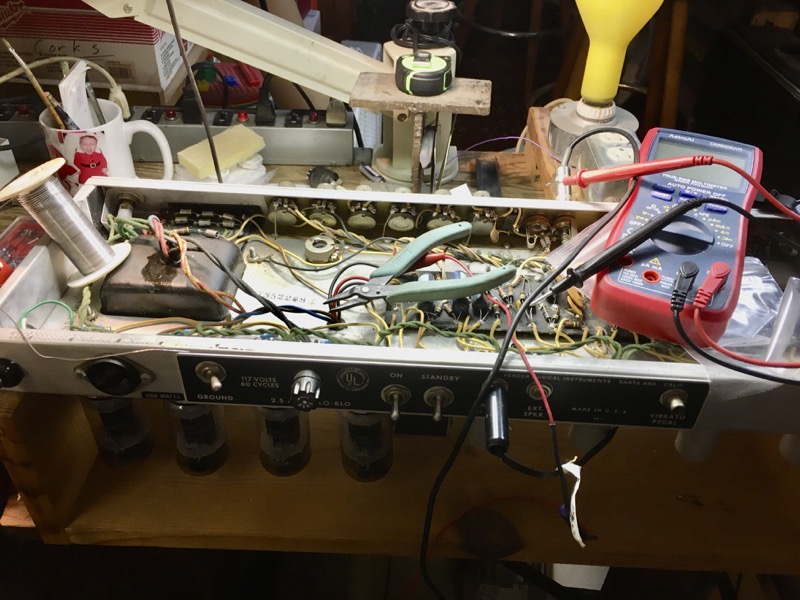
Some Amplifier Repair
I have been working on my Dual Showman amp for a couple years. It had a problem with one of the channels not working properly (like not at all). My first attempts, a couple years ago, didn't seem to help so I put the project on hold.
Due to the covid quarantine, I have taken another shot at fixing this. My strategy this time is to learn everything I can about the electronics in this amp. My main source has been a series of Youtube videos by Uncle Doug [ See his youtube channel here. ] He is a former teacher who uses these skills take viewers along while he repairs and reconditions MANY guitar amps. He also has videos explaining the function of each amplifier component (in general and within these amplifier circuits.)
So, with his guidance and hours spent pouring over schematics, I have gone over this amp with a fine toothed comb and in the process I have become very familiar with how every part of this amp should work, and why. I have replaced weak and out-of-spec components and double checked all connections and solder joints.

Good to Go!!
After all these many long hours of effort and study, the channel was still dead -- until today! I found one cold solder connection hiding in a place that I hadn't looked before. This not only fixed the problem -- when I re-soldered the connection -- but made perfect sense that it was what was causing the problem. Whew.
It's been 40 years since I've heard this amp work properly. This is a great moment. There's nothing like the sound of a vintage Fender tube amp, or the feel of this sound in you chest.
"Now All I need is a couple guys to har-mo-nize and I'll��ll be a happy boy ."
May 2020: Two more clocks finished.
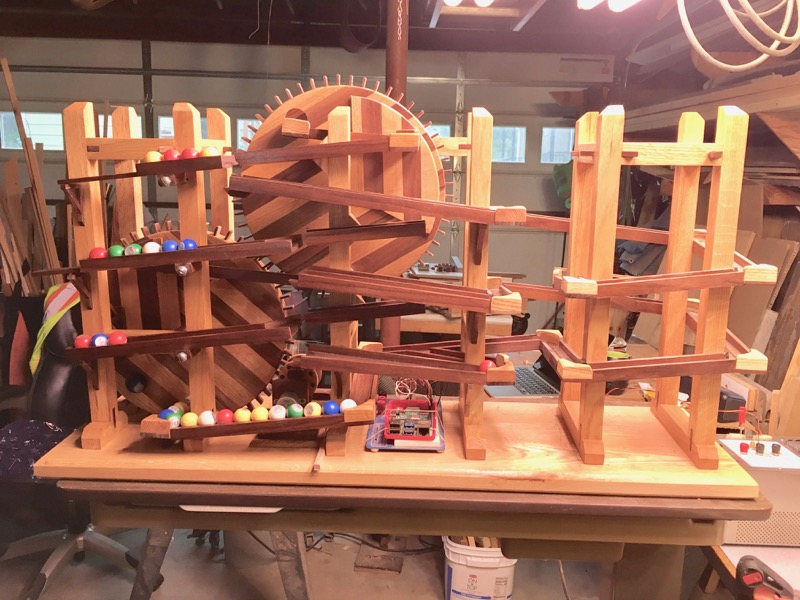
First Running of the Clocks
Endings: The clocks are finished and today I began the test run-in phase. They both work fine and I am relieved to note that these little stepper motors are plenty strong to power the drive gear assembly. Because these are clocks, it is not enough for them to run -- they must run perfectly. If a ball hangs up OCASIONALLY it is too often. Minor adjustments will be made over the next few weeks of 'run-in'.
Click on image for a larger version of this picture.
Click here to follow progress on the steps to finishing these two clocks (check out some efforts in making new format of the site as well).
May 2020: Sourdough Bread
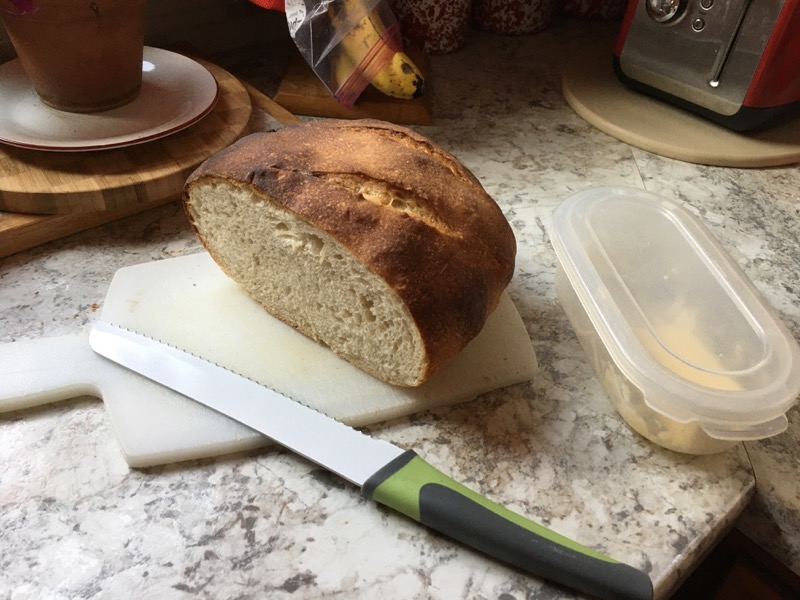
It's been impossible to find yeast either in the grocery stores or at Amazon. So I was forced to try my hand at making my own.
After much reading and overcoming a good deal of fear, I made a starter. Then after nursing the starter to life, for a week or so, I have baked my first loaf.
I think it turned out pretty good.
Click on image to enlarge
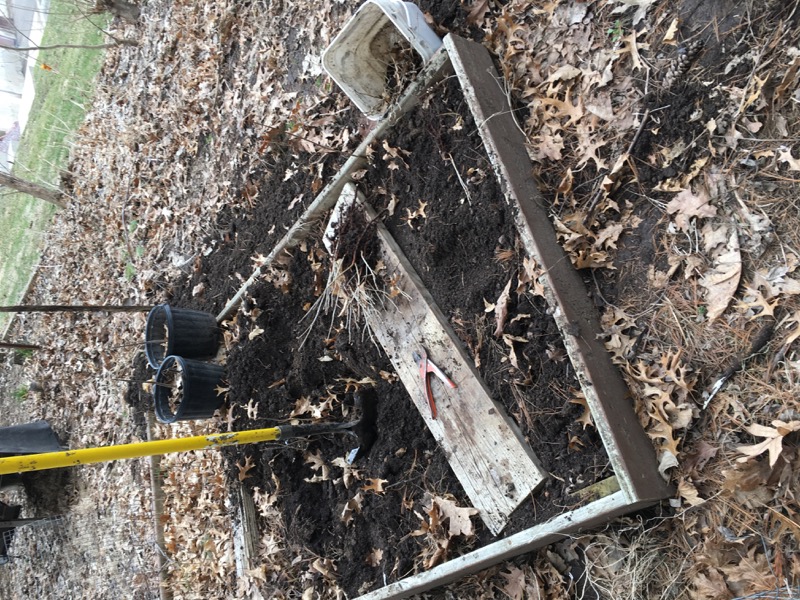
April 2020: Potting Oak seedlings
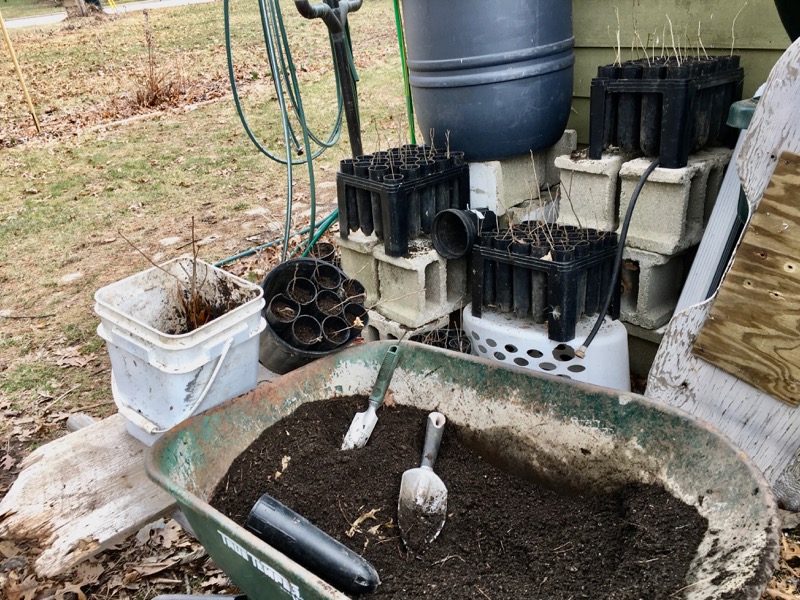
Due to the Corona Virus we have canceled our tree order with the DNR for this spring. We are uncertain how soon we will be able to travel so this just removes one more complication.
And since I don't know if we will be traveling, I decided to pot up these Oak seedlings and let them grow in my garden for one more summer.
Click on image to enlarge
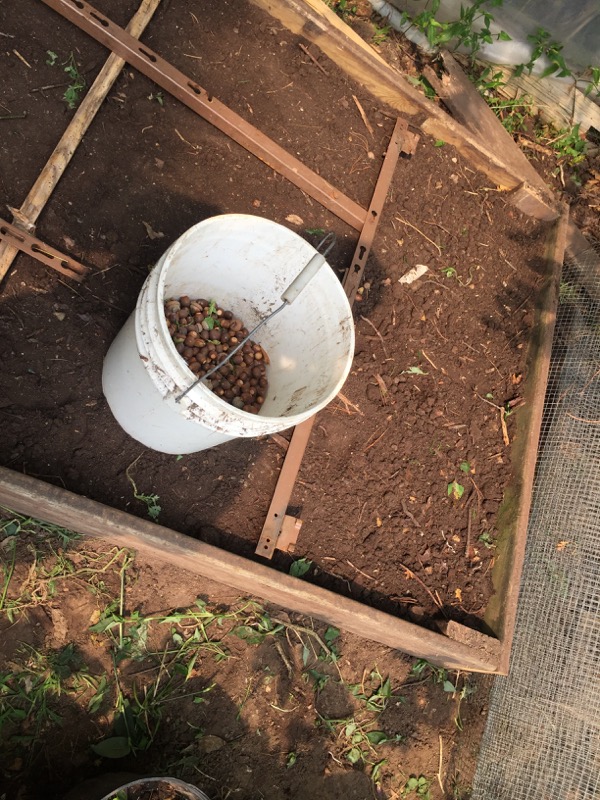
Later in March 2020: Lifting seedlings and dropping acorns
Lifting seedlings from backyard nursery
Two years ago (fall 2017) I filled this seed bed with acorns. I accidentally laid some metal against one of the corners of the frame and this opened a small hole that allowed the squirrels to break in. Before I knew it they pretty much decimated my acorns before I could plug the hole [see more of this sad story]. This spring I am digging the survivors (~100 seedlings) so I have room to lay out a new batch of acorns.
Click on image to enlarge
Cold Stratified acorns ready for seedbed
I collected these red oak acorns last fall -- mostly on the campus of UW - Madison. Red oak need to go through a period of cold (winter) before they will sprout. This works best when they are surrounded by soil that has the same moisture content and temperature as in the floor of a woods.
So I put them in a holy bucket, covered with dirt and buried in my compost heap with a screen over the top to keep the squirrels out but let any rain in.
Click on image to enlarge
I was fortunate to dig them now as they are just starting to sprout. The new root is the first to come out and if it is too long it will very likely break off while you're planting it.
These acorns are perfect; I can tell which ones are good and not risk damaging then in the move.
Click on image to enlarge
Dropping the acorns
I've leveled the soil to within an inch of the top edge of the frame. They need to be close because I will be adding screening over them and I want their stem to grow up through this before they begin forming their first leaves.
Now to carefully place the acorns as evenly spaced as I could manage. I try to give each nut a bit of room. It's a delicate balance between reducing competition and allowing for germination failure.
I had too many for the space.
Click on image to enlarge
Covering the nuts.
I've attached piece of screening to the top of the frame. This has a 0.5" square mesh and will keep the squirrels from digging the new acorns.
Usually I just leave the acorns sitting on the soil surface but I had some sand in the shed so I sprinkled a thin layer of this on top of the nuts to act as a moisture buffer. I know they do this for evergreen seedbeds so I didn't think it would hurt.
Click on image to enlarge
Added defense against squirrels, etc.
Sometimes the squirrels will pull the new seedling up through the screening in order to get what's left of the nut. I've added this second box frame over the seedbed to make this harder for them.
The day after I set this all up, I noticed a hole had been dug next to the frame in an attempt to dig under. I added screening around the bottom of the frame and extending at least a few inches into the surrounding area.
Click on image to enlarge
March 2020: Covirus lock-down
Finishing Clock towers
As we hunker down at home to weather this pandemic, I am pushing ahead to complete these two clocks.
I've waited until I finished gluing on pieces and now it's time to apply the Polyurethane finish. You can see the difference in color in this picture -- one finished, the other bare wood. The walnut really darkens.
Click on image to get better look...
Click here to follow progress on the finishing stages of this project.
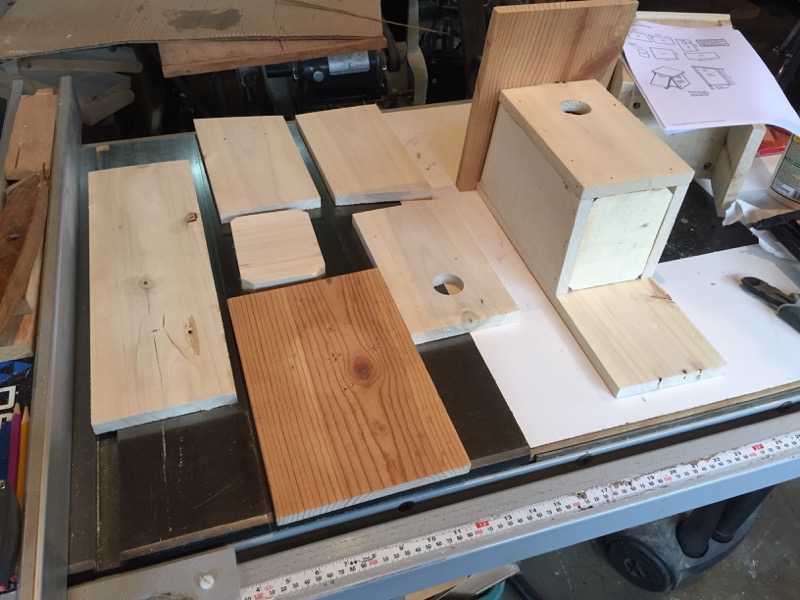
March 2020: Owl Box
.jpg)
Owl Box
I get tired (bored?) making more clocks so I look for diversions. So here is an owl box. It looks smaller than it is (that's a 3" hole).
Made from old barn boards that are left 'raw' as much as possible.
I'll hang it up and see what comes. Probably a squirrel.
February 2020: Slow progress on the 'little' clocks.
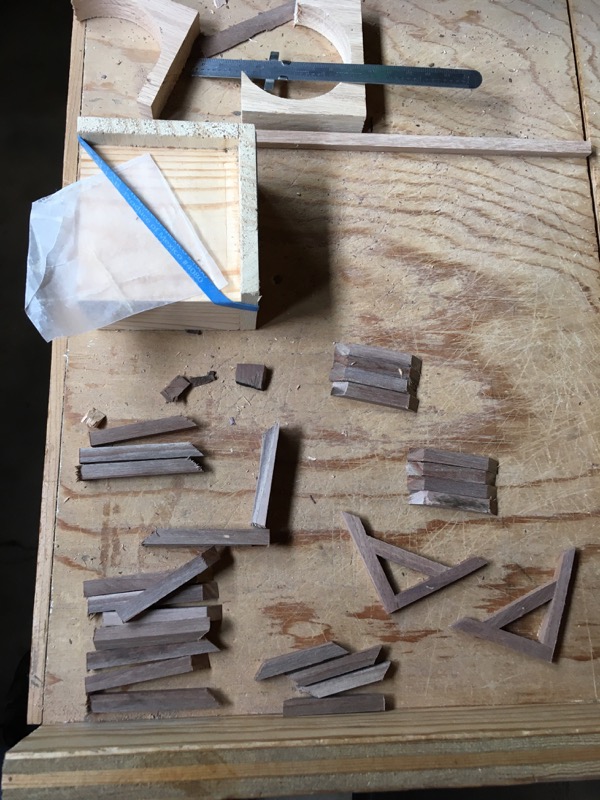
Small pieces
The clocks are progressing at a snail's pace. It is truly governed by the 90/10 rule (the final 10% of the project takes 90% of the effort).
Here, I'm gluing up the small braces that go under the wide tracks. These are more for looks than function because the glue on the tracks is enough to hold them onto the frames. But the looked so good on the original clock that I had to include them.
But this is fiddle-y work and very time consuming.
OR, I might call it 'attention to detail'. What do you think?
January 2020: Re-purposing some odds and ends around the shop - Bird Feeders
Bird Feeders
We replaced a bunch of windows on the house last year and this orphaned many window screens. It seemed a shame to toss these things so I pulled out the screening for use in these bird feeders.
This screening is in excellent shape and looks like it's made with copper wire. This is 60 plus years old and made before they started using nylon for screening.
I used up some scrap pieces of wood for the frames -- saved that from heading to the wood-box for kindling.
These may be next years Christmas Presents.
October 2019: Hey what about some Ginko?
Ginko
I was riding bike through Madison last summer and some Ginko leaves caught my attention, for some reason, and the thought started brewing in my mind; "Why haven't we planted any of these at the farm"? I have a degree in Botany so I am very familiar with the life and lore of this ancient species. It certainly should be hardy for north-western Wisconsin. So I decided to start pondering this project.
Summer progressed and I didn't think much about it until one of our monthly plant pathology department retiree coffee. For some reason I brought this up and my friend Paul said he had a bunch of Ginko seedlings in his yard. He pulls them up like weeds. It seems one of the Ginko he planted in his yard turned out to be a female -- a seed producer -- even though the nursery assured him it was a male. (Most people avoid female Ginko because the seeds stink.)
I was planning a trip to the farm to pack it up for the winter so he gathered a dozen seedlings from his yard and I took them along.
Filling in for failed Oak
Last year I planted a number of Oak seedlings, from my back yard nursery, and set up wire cages around them to protect from deer. Some of these didn't survive the process so I replaced the Oak with the Ginko.
Planting Ginko
I don't know if deer like Ginko so I will cage them just in case.
Should I also put screens around them to keep out the mice?
October 2019: Triumph Spitfire (for sale)

1978 Triumph Spitfire
I bought this little car in 2001 from a fellow by the name of Bahman; who said I should drive it for a while and have some fun. Then when I'm tired of it, take it to MACCO to have it painted and then sell it for a nice profit.
Nearly 20 years this car has been sitting in my garage. I dig it out once a year and drive it around the block. Give it a good washing; fix a few things - if needed; and then back it into the garage again.
This year I decided that I'd never do any more with it and that and I needed the space for my other projects.
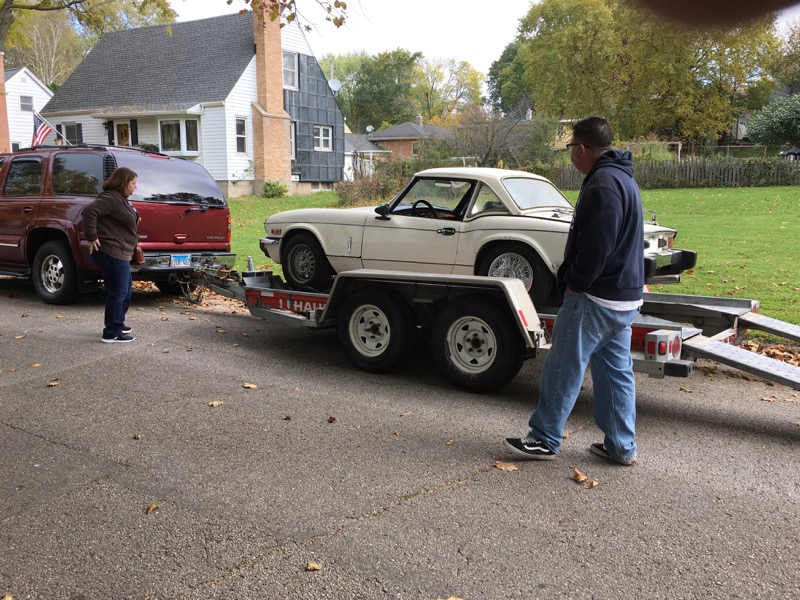
Sold
So this year I listed it on Craigslist and sold it.
It was very hard to do -- very hard to let it go -- but I'm convinced it has gone to a good home. The new owner has lots of ideas for fixing it up and driving it around (in parades, rally's, etc.). And, most importantly, she has the support of her family who seem to have both the time and the experience with restoring old cars.
Good bye old friend.
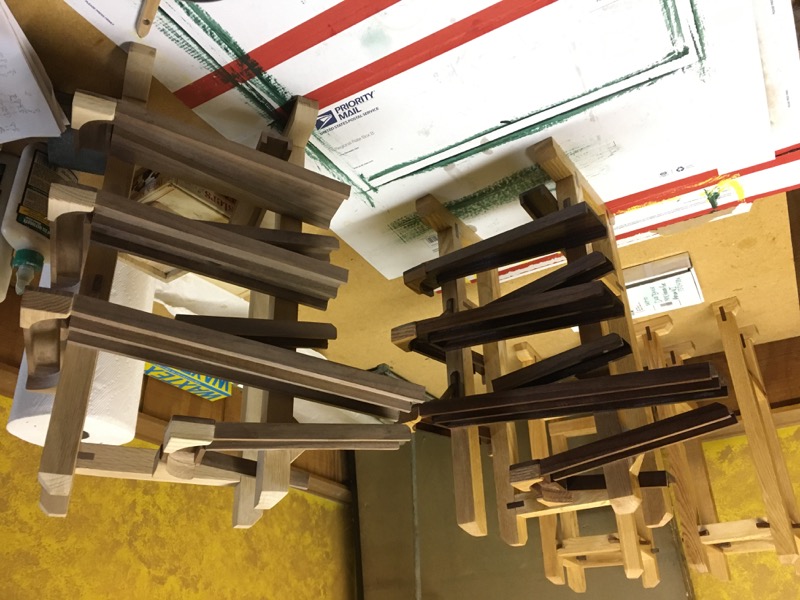
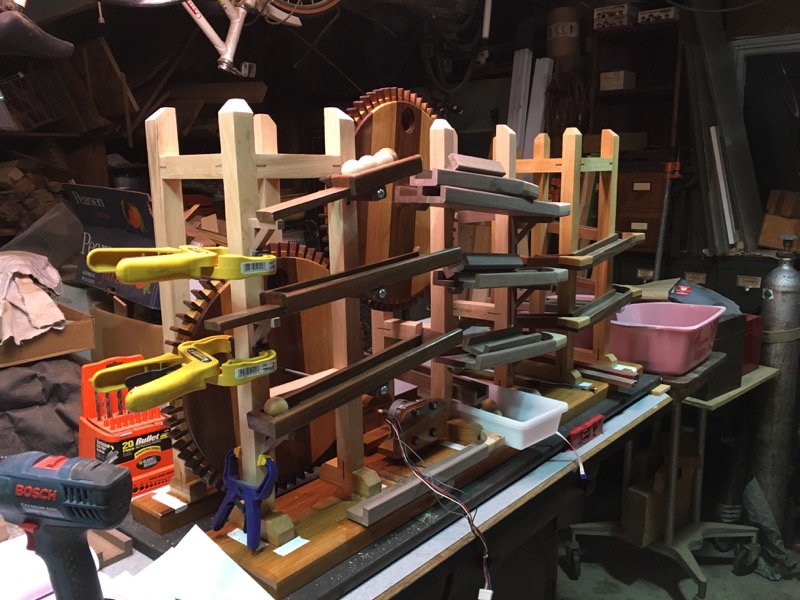
Spring 2019: Building more ball clocks
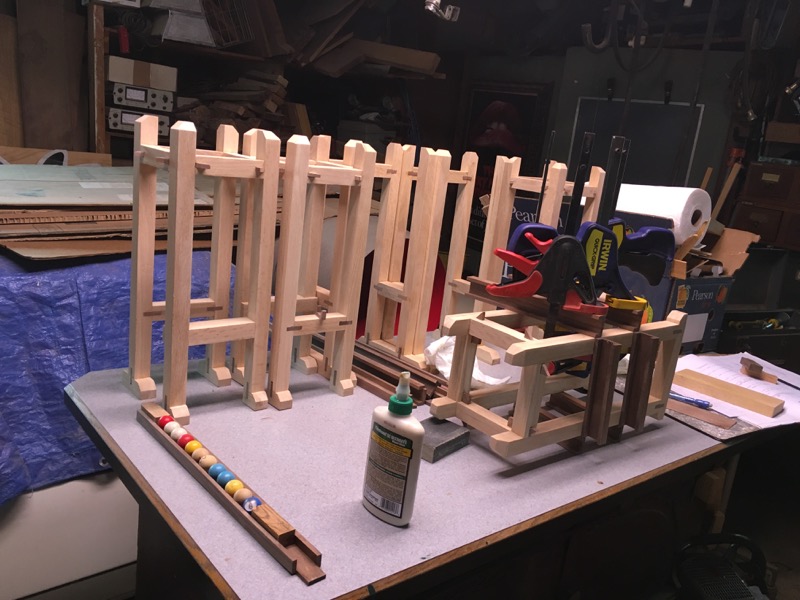
Ball Clocks II & III
My original idea for building a Rolling Ball Clock was to make use of the old Bingo Balls from our Wednesday Bingo at Goodman Community Center. These balls are 7/8" (<23 mm) in diameter. After about a year in use, the numbers on these balls become unreadable and we order a new set. The balls are still fine and it's a shame to just throw them out so I thought this would be a nice use for them.
Now that I've built one clock (we'll call it full-sized) I feel comfortable adjusting the scale to 0.80 % and building another. And while I'm building another, why not build two.
Here are the six towers and I'm beginning to attach the tracks.
Click [here] for more of this story.
June 2019: 20 Years Raising Cecropia Moths (will this be the last year? - click for more )
Cecropia Moth (Male)
The 2019 spring season has been cool and wet which may have led to our moth's late emergence. Or it may be that we simply had a batch of moths that were all members of the second wave.
The first to come out were all males. After a few days I released all these guys -- so they wouldn't tear up their wings trying to escape.
Almost the next day the females began emerging. This always makes us a little nervous and second-guessing ourselves.
But nature prevails and we soon had a hand-full of males flittering around the cage. One began mating through the screen cage. I carefully caught two more and put them inside the cage.
After about 8 hours, I carefully transferred one of the mating pairs into a paper grocery bag. (not the pair that were mating through the screen - once they break they won't re-join).
It only took a few minutes for her to lay about 70 eggs on the sides of the bag so I released her to fly away and find other places to lay any remaining.
Now that I had enough eggs for next year, I opened the cage so the remaining females could fly away after they were finished mating.
Click [here] for more of this story.
January 2019: Switch Clock Control from Arduino to Raspberry Pi
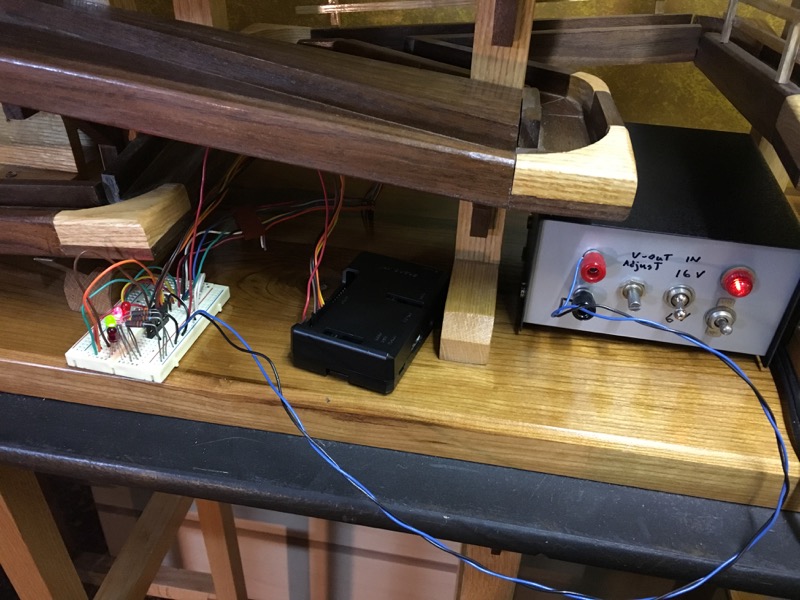
Raspberry Pi and new power supply
I was having some issues with the power supply I was using to power this clock so I build my own. This is an adjustable DC power supply based on an LM 317.
At the same time I had a chance to play with a couple Raspberry Pi systems. I replaced the Arduino and simplified the circuit slightly.
The Raspberry Pi comes with a Linux operating system and Python development environment. It also has WiFi so now I can monitor and control the clock remotely with either my laptop or my phone.
It's nice to have two Raspberry Pi's so I can develop and test the driving software using one (with monitor, keyboard, and mouse connected). Then I transfer the driver to the Pi that runs the clock.
A note on clock accuracy
Since beginning this project I've been thinking about how I would calibrate the clock to run on time. One of the reasons I chose the Arduino over the circuit described in the plans was to allow for feed-back from the running clock dynamically telling the Arduino whether it was fast or slow. Then having the software adjust the speed of the motor to compensate.
Since switching to the Pi, I now have a built in time reference (in Linux). Since the stepper motor is very precise -- it moves exactly 7.5 degrees with every step. I know that it will take precisely (360/7.5) = 48 steps per motor rotation. I also know the gear ratio of all the gears driving the main ball lifting wheels. So calculate the number of motor steps it should take to lift a ball; set the program to execute this number of steps; have the PI keep track of how long this takes (It should take exactly one minute). Have the program adjust the timing of each step either faster or slower until the clock is accurate.
Now my clock keeps accurate time.
November 2018: Video showing my Ball clock being set back one hour for Standard Time. Just for the fun of it...
September 2018: Back on the clock -- Motors and Drive Systems
Direct Drive
The plans called for a motor with a direct drive to the drive gear. This works fine and I like the looks of how it turned out.
When operation the clock in real time, however, it has to run quite slowly. Because of the nature of the motor, this causes a lot of vibration and is quite loud (for a clock). I've tried adding rubber mounts to the motor to dampen the vibrations but this doesn't help much.
When running the clock at 2X or 3X speed it quites down nicely so this made me think that I should gear the motor so it can run faster.
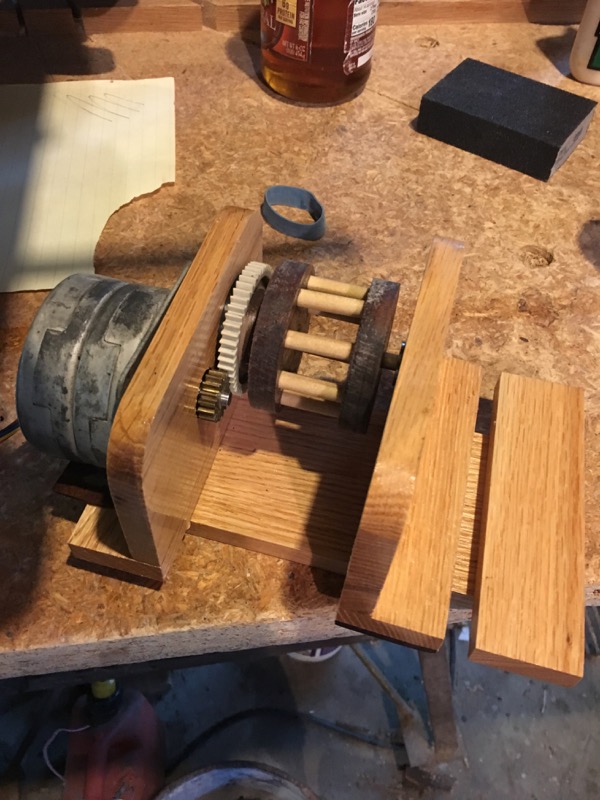
Geared Drive
I dug through my parts bin once more and found another motor and some gears that I'd salvaged from old printers. I found a couple bearings and cut up some more wood and here is Version 2 of the power pack.
After some minor programming changes to the Arduino code, this motor runs faster for the same clock speed. This means that it runs much more quietly, and it draws less current (for some reason). I don't like the looks of it as much as the original but I can live with that.
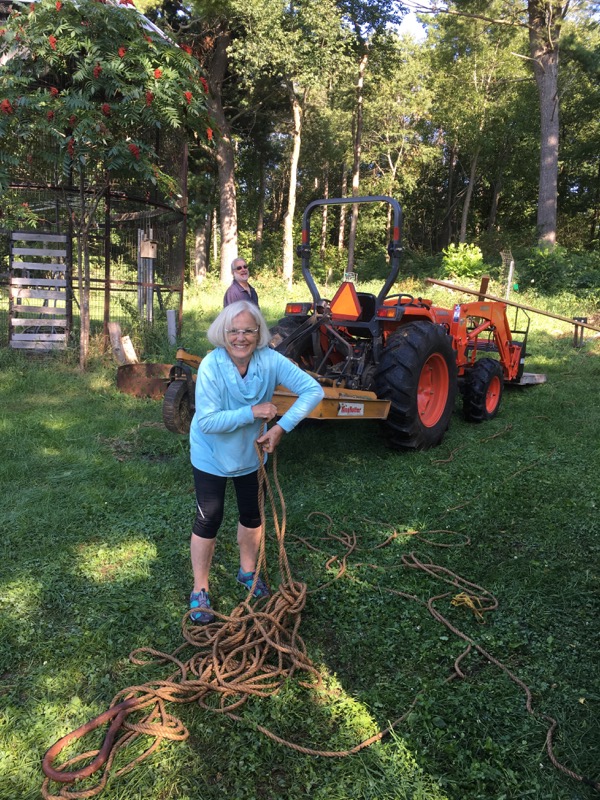
August 2018 (later) : Rocket Raising
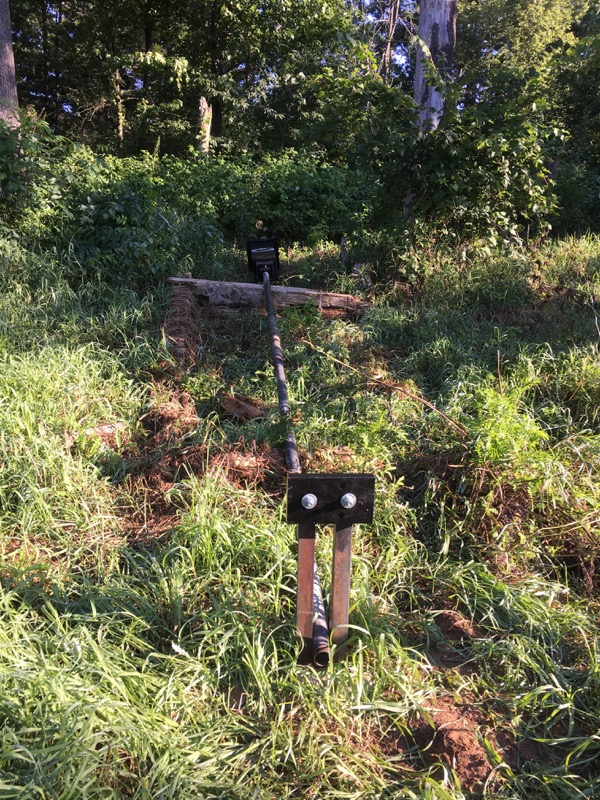
Ready to raise(click to enlarge).
I decided to pull the pole up with a rope and gin pole instead of push it up with the bucket. Lifting with the bucket on uneven ground seemed like too much risk of twisting the pole on the way up. (And the gin pole is so much more elegant.)
The cross piece on the base is just an afterthought. There were already matching 5/8" holes drilled in the angle iron stock so I cut a piece of 2X6 Maple and painted it black. I believe this will stabilize the angle irons (keep them from 'thinking' about starting to twist) and provide a stop for the raising pole. (It turned out that it wasn't needed for that since the pole went up so gently.)
Raising the bat house
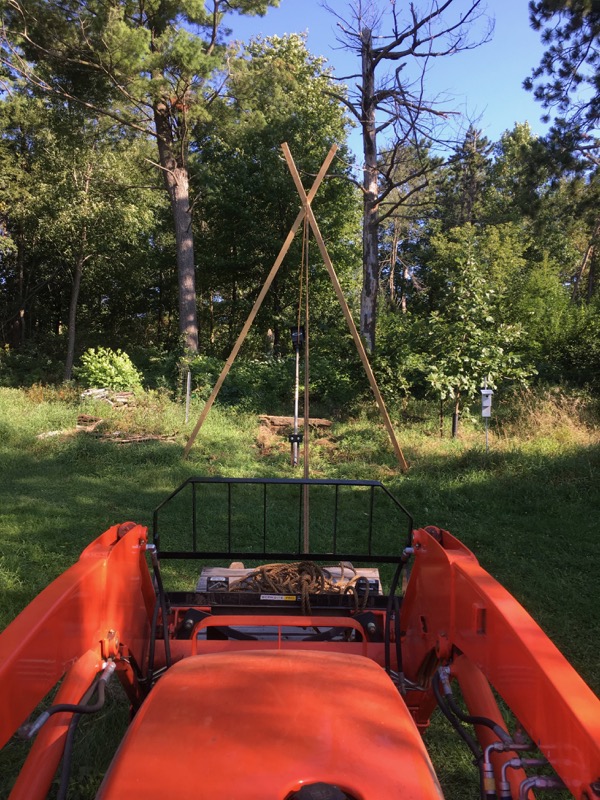

Raising of the Rocket House (click to enlarge).
Just as I was getting the Gin Pole in place and wondering how I was going to hold it up and pull the rope, Win and Kelly drove in. Complete serendipity.
With their help the whole thing went smooth as silk.
Now we wait to see if any bats will like this home. It will probably be next summer before they come looking for a place to raise their babies.
August 2018: Bat Pole
Finally checking off a few things for the Rocket Bat house project

Bat Pole (click to enlarge).
After finishing the Rocket Bat House I had to figure out a way to get it on top of a 20 foot pole.
I had a 20 foot piece of 2 inch pipe but I couldn't figure out a way to move that to where I wanted the house. So I cut it in half. I also had a piece of 2 - 1/4 inch pipe that had been a home-made post driver. It broke so I am using that to join the two pieces of pipe back to 20 feet.
I also had two pieces of heavy angle iron that I embedded in a concrete base. This base has two holes for the pipe; one at the base and one at the top. These will allow me to pivot the post -- with the top section and the bat house -- into upright position.
I am letting the concrete set up and will finish the raising next trip.
Here is the story about the Rocket Bat house -- in case you've forgotten. Click here.
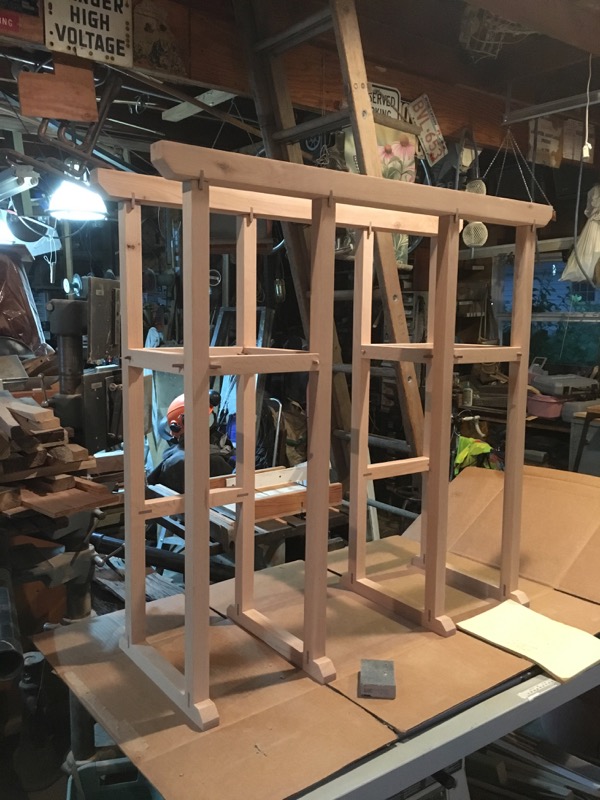
July 2018: Clock stand
The ball clock is *finished. Now it needs a fitting stand.
.jpg)
Stand for Rolling Ball Clock .
I wanted to make a stand for the ball clock that mimicked the style of the clock. I also wanted to be taller than normal table height so that the clock would end up at eye level.
I also used the same spline patterns. Walnut splines on all joints into the red oak frame. I didn't trim the splines on this stand to emphasize the techniques. As it turns out it would have been easier to trim the spines and smooth over the wood face.
* I have a couple of enhancements to the ball clock to complete. But it is working great and looks pretty good too.
June 2018: Fix roof on old woodshed
This project mushroomed very quickly
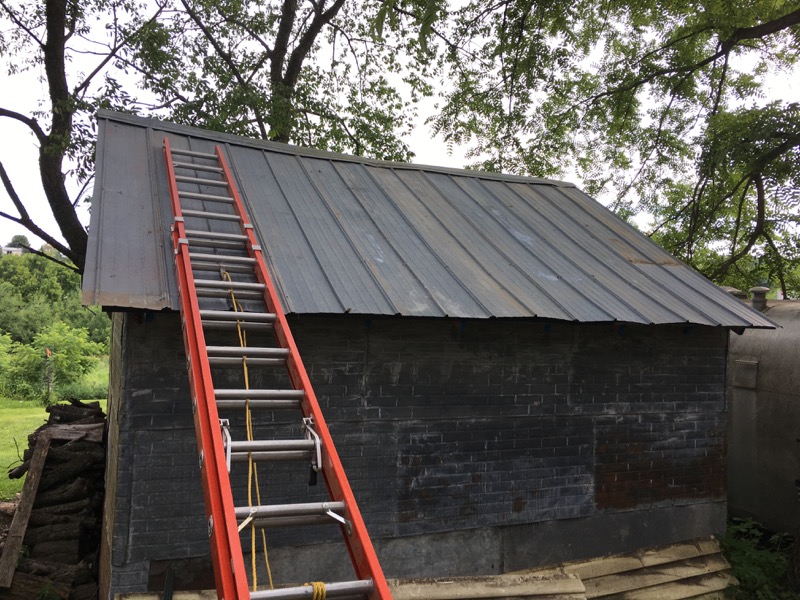
'New' tin roof on top of rebuilt structure.
This is an old shed located on the farm. It has been used to store wood, raise chicks, house calves, and store old windows. And it served us kids growing up as a playhouse.
So during it's lifetime, it has had many modifications and many repairs (of various quality). Half the roof has some old tin and half has shingles. The tin half is in rough shape but it's holding out the rain. The shingles are well past time to replace. One corner - near the peak - has been leaking for a couple years and if I didn't do anything the whole building would go down very soon.
I have some stacks of old tin roofing that came off the tin shed when a storm put some trees down. (insurance replaced the whole roof since they couldn't match the tin).
I was planning to just tack this tin on and be done with it. Half a day and done. Right?
Click [here] for the rest of the story.
June 3, 2018: Transplant update
It's been a month since I transplanted those Pine and Spruce (and the Oak). The ground was nice and wet when I dug those in but there was no rain here for three weeks and it's been unseasonably warm. So it was dry by the time it finally rained a week ago, now.
They've had plenty of rain since and everything seems to be growing nicely.
June : Release transplanted Oaks / place cages
June 2018: Back on the clock -- the scenic route
You would think warmer weather would make this easier.
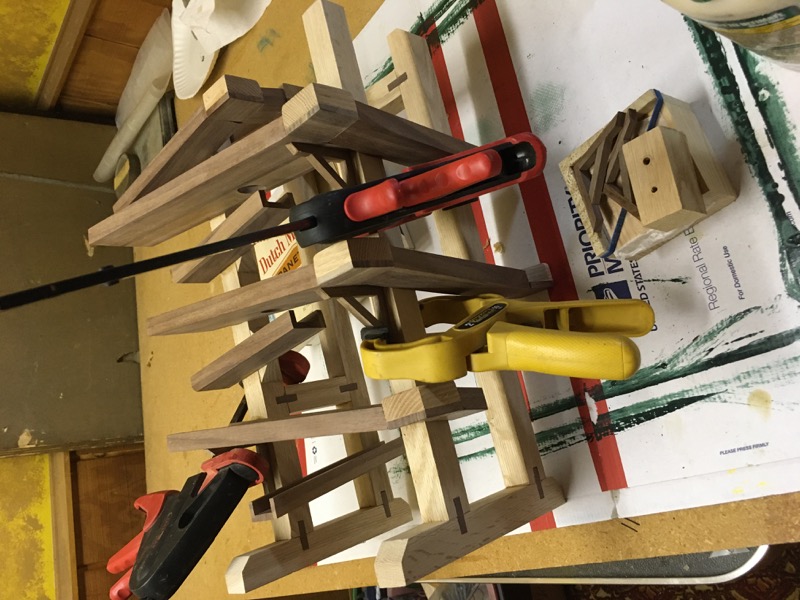
Getting it all set up to work together
Now that working in the garage is more comfortable, I am busy with all the other spring activities and have very little time to work on this clock. But I still sneak time and try to do at least one thing each day.
Now that most of the pieces are made and mostly assembled, I am spending a lot of time rolling balls down ramps to make sure all the pieces work together as they are supposed to.
As you can see I am using clamps and double sided tape in a lot of places so that I can make adjustments and do some of the fine tuning. I am very reluctant to make things permanent until I am sure it is exactly placed.
There is an adage in project management called the 90/10 Rule; the last 10% of a project takes 90% of the time. Read More...
May 2018: Spring Field Day for Woodland Owners, Poynette Wisconsin.
Sponsored by: BHC-WWOA; WWC; WTFC
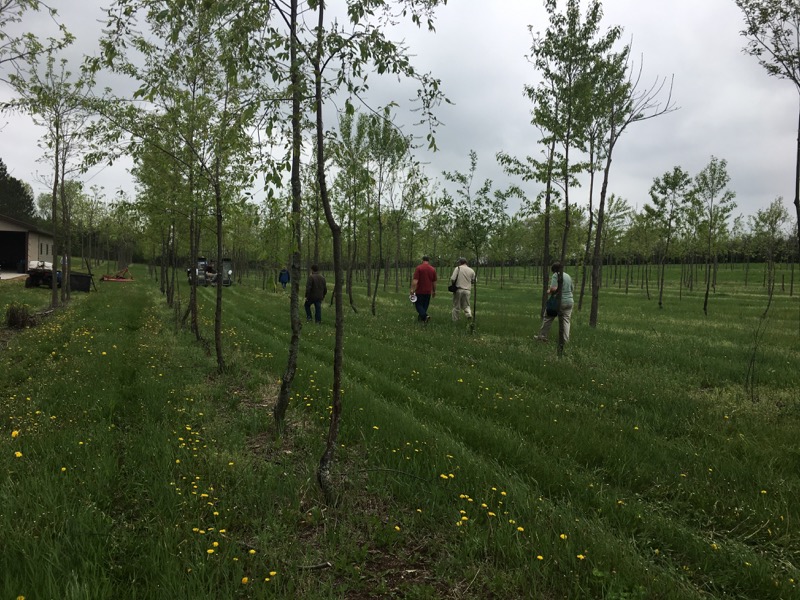
Walnut/Cherry planting
This was an example of a planting Walnut and Black Cherry from seed on land that is Sandy/Loam or Loamy/Sand<.
This woodlot is intensively managed with mowing and herbicide to control the grass (to mitigate competition for moisture in this light soil.) The trees are widely spaced to limit competition for precious water. The rows are widely spaced to permit harvesting of nuts (I guess).
These folks manage this plantation very intensively. It looks great. They're growing Walnut on land that the 'experts' say is better for Red Pine. And it's working for them.
It's great to see all the ideas people have.
May 2018: High school Softball.
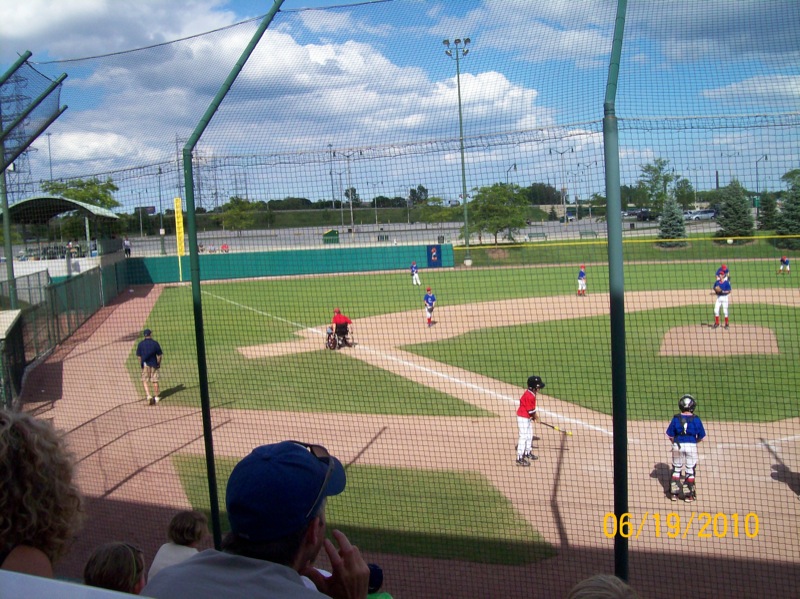
Picture of another game (from file)
Double Header
It only took two hours for the home team to win both halves of the double-header. As umpires, we tend to brag about this sort of thing (among ourselves, of course), as if we had anything to do with it. It was all the home team, actually. All I could do was to make the strike zone as large as I could to help the visiting pitcher - so maybe that did help a bit in that there weren't so many walks. It forced the home team to put the ball in play and this gave the visitors opportunities to practice fielding, throwing, and catching (and they needed all they could get.)
Visiting team were all Freshmen in this Junior Varsity game. Many of the home team players could easily play on Varsity teams for any other school, including the pitcher. She threw hard and straight which left many of the visitors standing and merely waving the bat as three strikes whistled past. And she pitched both games. She had a good night and she was devastating.
It was a beautiful night for softball. The game was a little ugly at times but we get paid the same and we can get dinner a little sooner. It balances out some of the awful weather and miserable long games we have to endure during the spring season. It's the way things go. But of course it's not about us or the weather, or the money, (or even dinner); it's about these kids. Whether they are the ones who had to swing at pitches that were obviously not strikes, or whether they are the ones who had to stand up there to be bombarded by large yellow projectiles whizzing past them - dangerously close. I admire all of these kids. They are all doing something great that requires a ton of heart, dedication, and hard work; and it's an honor for me to be able to participate in some way.
May 2018: Transplant Trees - Filling some gaps in the wood lot.
Oak transplants from garden
Tree Order from DNR
Species Age Bulk # Ordered Total
PW3 Pine, White 3-0 200 $115.40
SW2 Spruce, White 2-0 100 $49.90
Total 300 $165.30
Trees from my 'garden' nursery.
~ 50 White Oak and Red Oak.
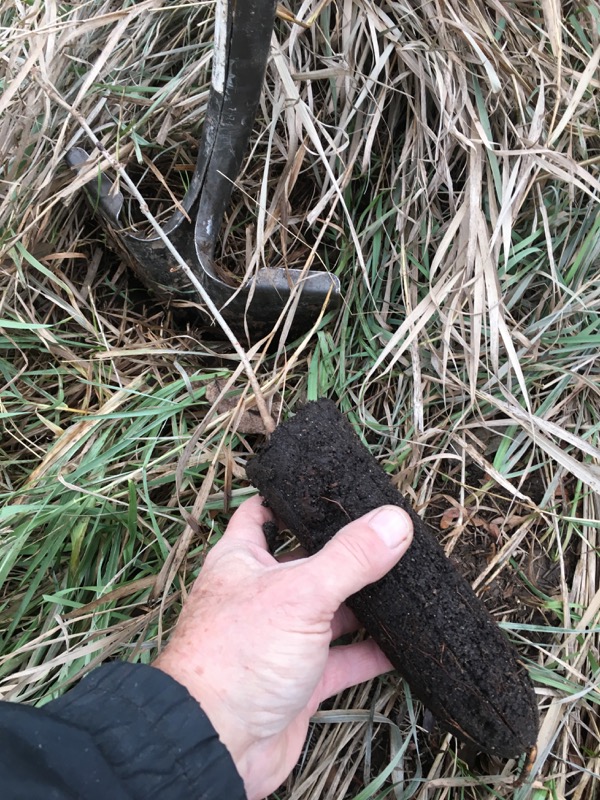
Remember: last spring (2017) I was clearing out the remaining seedlings from my seed bed.. It had gotten too late to move these into the woods so I potted most into D80 tubes or 6" pots. On a few, the taproot was too big for a pot so I dug them into my garden and gave them TLC for the summer.
Now I've dug these at bud break and brought them to the farm to plant along with the pine and spruce.

Sprouting acorns
Seedbed survived the winter intact
This seed bed survived the winter and has so far resisted any attempts to enter by hungry squirrels and other seed lovers.
Read more about 2018 in the woods....

Rare late April snow and cold / Spring is not far away (I trust)
March 2018: Update Kitchen counter, backsplash, and sink.
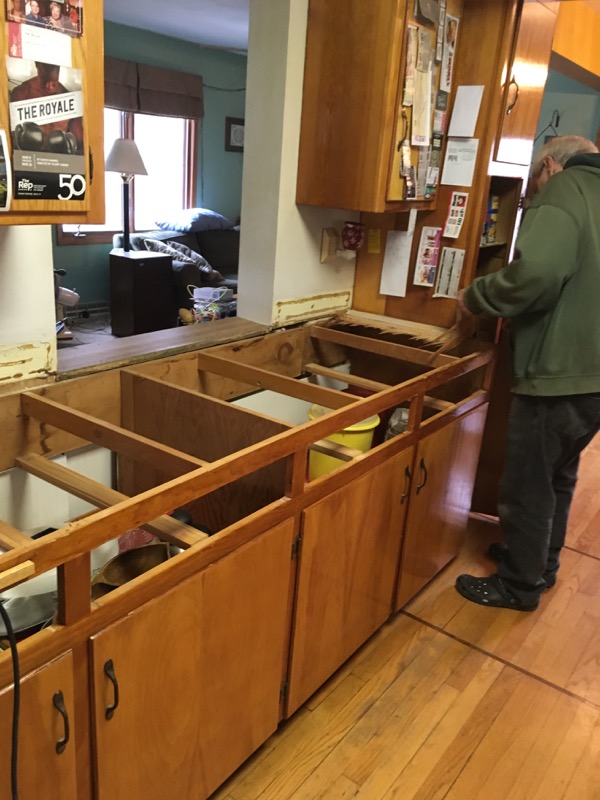
Remove old counter
(click on image to enlarge)
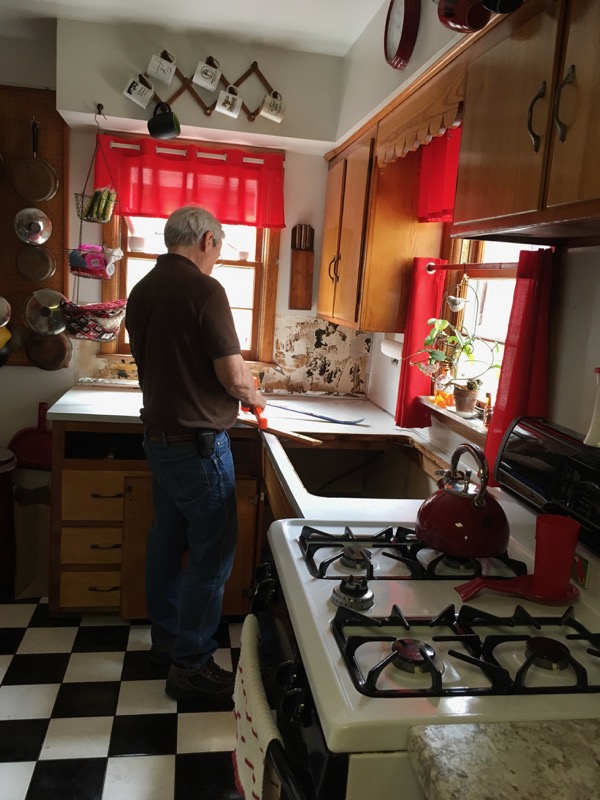
Remove old sink
(click on image to enlarge)

Apply new tiles
(click on image to enlarge)

Finished counter and backsplash
(click on image to enlarge)
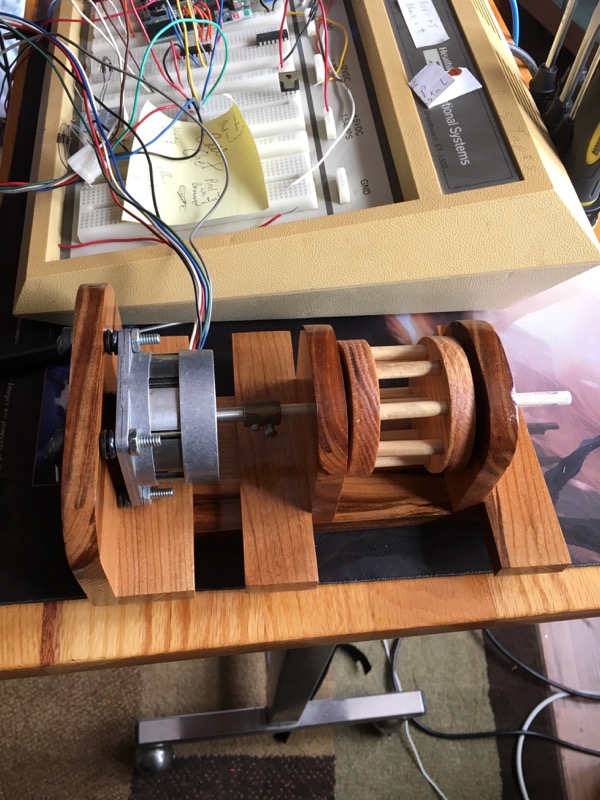
January 2018: Begin building a Rolling Ball Clock.
I've always wanted to build a Rube Goldberg sort of thing and a rolling ball clock has always seemed to fill that bill -- in my mind.
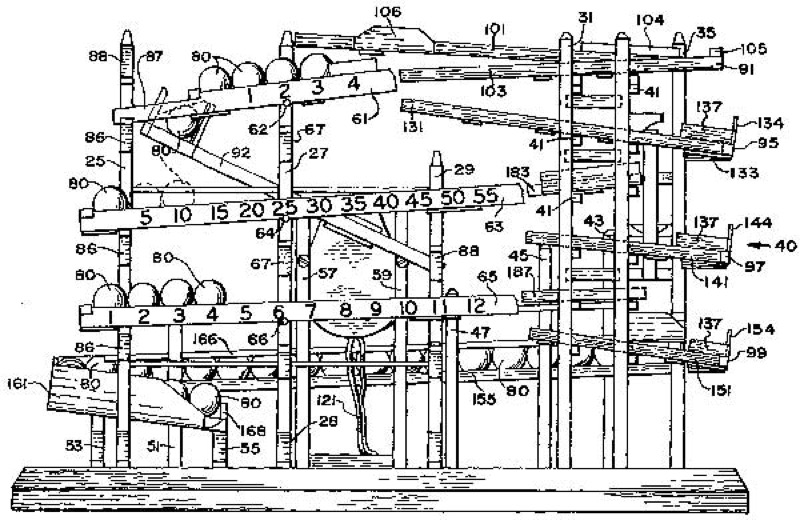
Figure of US Patent 4,077,198
(click on image to enlarge)
Okay, there are tons of of these things out there. All different designs and sizes and shapes. Just Google "Rolling Ball Clocks" to get an idea.
I've been searching for these on the INTERNET for years and all I got was offers for kits. This fall I found the first place that offered plans for building one of my own that were reasonably priced.
I ordered a complete set of plans for $25.00. I downloaded them (as PDF) and printed them out. They were great. Very well though out and complete.
Plans in hand I set about to building this rolling ball clock.
My first thought was that this project would be a great way to use up some of the small pieces of scrap wood that I've accumulated over the years from building other projects. Then I decided that this clock would look great with a mixture of Red Oak and Black Walnut (my favorite combination). I don't have many scrap pieces of Black Walnut.
What I did have was a nice pile of Black Walnut that I'd cut for firewood last winter and stacked in my back yard.
So I trimmed the pieces with a hatchet and then squared up a piece on my table saw. Now I could shave off nice pieces of Walnut for both splines and for ball track sections.
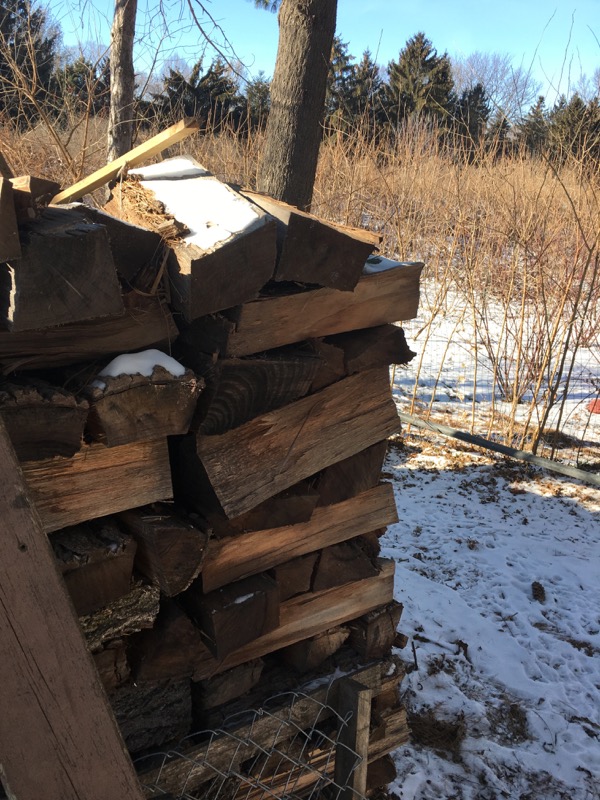
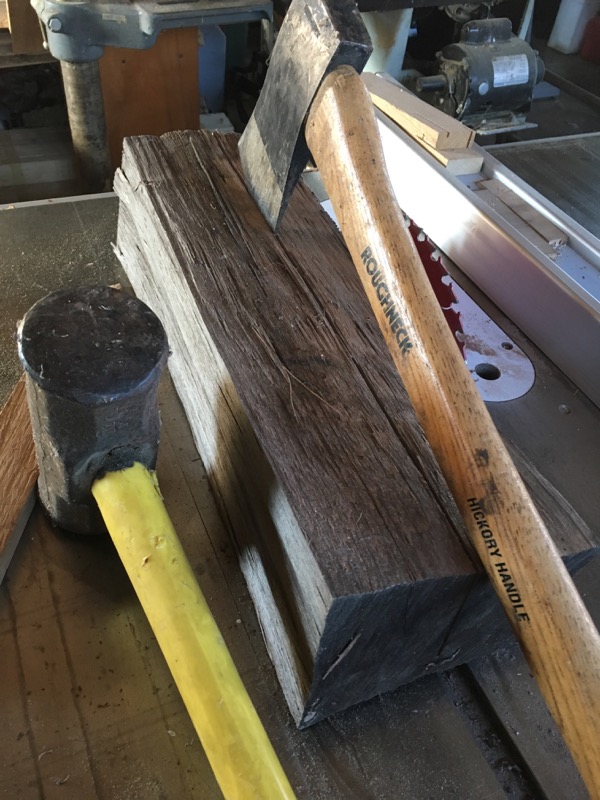

Black Walnut source
[ Click HERE to follow my progress in building this ball clock project ...]
November 2017: Late season week at farm.
High Pruning The Walnut Stand (Five Mile Plantation).


First 'top down' pruning of 'five mile' walnut stand.
Foresters say when you are pruning hardwoods for lumber to look up. Pay close attention to the top of the tree because where the leader grows, so grows the tree.
The oldest stand of Walnuts on our farm has been pruned up from the bottom; 3 or 4 years ago. On this trip I borrowed a pole saw so I could start attending to the tops. My primary aim is to remove any close crotches and establish a leader.
Care must be taken not to take off too many of the side branches so as to destroy 'the factory'. I also don't want to re-open the canopy which has nearly closed in this stand which kills off the grass around the trees. Grass is the main competition for resources (water and nutrients) for these trees.
There are a few trees that are tall enough where I could prune off side branches as high as I could reach with this pole saw. (it has a 9' shaft) This insures at least one whole 8' saw log.
A first: Transplanting Oaks in November (into frozen ground.)
Frozen potted Oak
Transplanting
Frozen potted Oak
I don't like leaving potted (tree-tube) trees exposed through the winter. The pots don't provide the roots with enough protection against the frost (or perhaps the freezing/thawing cycles). When I put these potted Oak trees at the farm I had planned to cover them in straw or something. I forgot.
I learned that my brother was trapping gophers so I though "if he can do that I can transplant trees."
Even though the potted trees were frozen solid, the warm sun warmed the sides of the pots enough that the root ball could be knocked out (without breaking the pot).
The top inch of the soil was frozen but once you cut through that it is easy enough to make a hole that you can 'drive' the root ball into.
I am careful to flag each new seedling so that I can find it next spring and somehow protect it from the grass, rodents and perhaps the deer.
Location: I am filling in gaps in the hillside Walnut plantation (five-mile) east of the gravel pit. This is not the best soil (gravel and clay) where the Walnut are not doing very well.
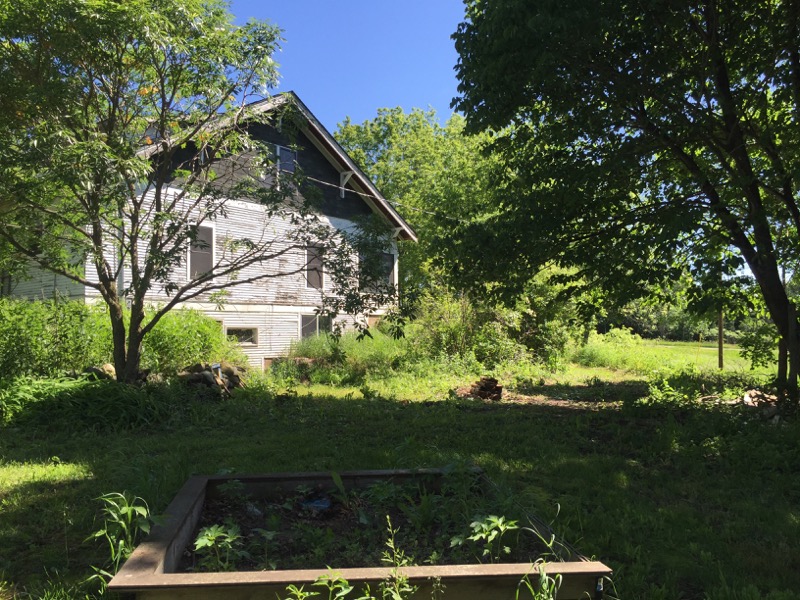
Gas Company Clears Pipeline Right-Of-Way.
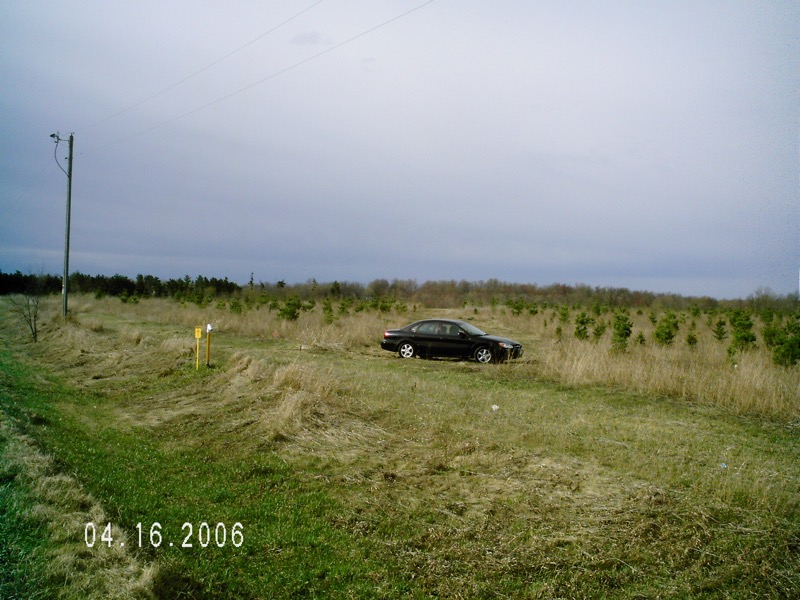
Cleared pipeline : (Left 2017) (Right 2006) - notice how much the trees have grown.
Northern Natural Gas company has a pipeline that runs diagonally across our property. This was installed back in the 1960's when my father sold them the right-of-way. Selling this land seemed to be a good deal back then because this was crop land and he could still use this land to raise crops. And he used the money he got for the land to pay for a new silo (which was much needed at the time). There didn't seem to be a down side and he was doing his civic duty by allowing the gas to flow for the greater good.
Fast forward 50 years and now the gas company owns a 50 foot wide steep of land that cuts though my woodlot.
Every ten years they come through and clear a 25 foot wide strip down the center of this right of way. It doesn't matter if I have a 'crop' growing or not.
Google Maps GPS view of the pipeline's path, crossing our farm

GPS Pipeline path
This Ariel view shows the path of the pipeline across our farm. This was taken before the 2017 clearing so it is rather faint so I've circled it in black.
As you see it nearly transects the entire farm. Nearly 3000 feet of my cropland that I cannot plant into crops.
This used to bother me -- a lot -- until I realized that my trees were getting to the point where I would soon have to do a thinning. Loggers would need access to the rows in order to remove the logs.
The gas company has cut me a very nice road. It's not in a perfect place but it comes close. And they come through every 10 years to maintain it.
Click here for Full 2017 Forestry PageOctober 2017: Finishing up a bunch of Kazoo's
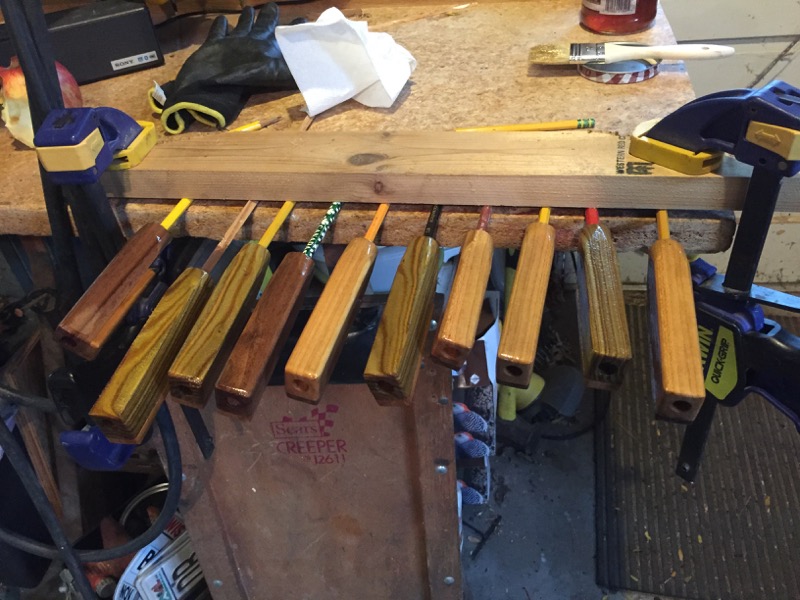
A batch of Kazoo's
My friend Chet asked me; "What in the world are you going to do with a bunch of Kazoos?"
I said; "I don't know. Maybe give them away."
He pleaded; "Please don't give them to my grandkids."
Here they are, drying after the first coat of Polyurethane. I have used a number of different woods in these instruments:
- Red Sumac
- Black Walnut
- Black Cherry
October 2017: White Oaks start growing when the nuts hit the ground

White Oak Sprouts
This fall was a great year for nuts. I collected Red Oak, White Oak and Burr Oak from many locations in Madison, WI and filled two large seed beds (one in Madison and one in Centuria.)
I have known that White Oak acorns will sprout there tap root almost as soon as they hit the ground but I've never seen them grow a tree before snow fall -- until this year.
Already in October, these two little trees have already sprouted through the screen which covers my seed bed. Maybe because we haven't had a frost yet in Southern Wisconsin.
If you take a close look at this picture you will see some of the competition a new tree faces as it starts it's life. (It's only been a couple weeks since this was bare ground). I think that anything a tree can do to get an advantage over these 'weeds' will give it a leg up.
With most plants, the first one to the sun usually wins (IE. survives).
Note: this story doesn't have a happy ending. Check out the details in the 2017 page. More...
August 2017: It's nut picking time again.
Picking Acorns on UW Campus
August 21, 2017: UW Campus Burr Oak are in full drop mode. (These trees usually drop nuts about the time students are moving in for the fall semester - which will be next weekend). I collected about 10 pounds from the trees behind Ag Hall (on top of the hill). Burr Oak acorns are quite small so this amounts to a lot of seed - probably all I'll need from the White Oak family this year.
August 25, 2017: It's still a bit early for Red Oak acorns. There are a few green nuts on the ground but the squirrels are rushing the season and they tend to have fumble fingers while foraging in the trees.
Shag-bark Hickory are loaded this year but have only begun to drop. Again the squirrels have taken the lead.
New Seed Bed ready for planting
Seed Bed for Acorns
This year I have taken greater care in building my seed bed.
- The sides need to be buried at least 4" so the animals cannot burrow under. The bed is filled with compost within 3 inches of the top of the boards (so that the acorns will be close enough to the screen that the secondary leaves form above the screen; yet far enough so the squirrels cannot reach the nuts.)
Read more...
June 2017: Vacuum repair (Hoover Model U5507 Left Head Strap broken)

Repair Part for Vacuum
Replacement Hoover part (Left Head Strap) built from White Oak.
(This is a simple little side project that I'm sort of proud of, so i thought I'd share.)
A friend borrowed our upright Hoover Vacuum cleaner to clean out his car. In the process he dropped it (somehow) and the upper (bag section) broke off of the base section. These two sections are held together by two "U" shaped plastic brackets -- one on either side. When the unit fell, the left side bracket broke.
I Googled this part on a Hoover parts page and found both these brackets. The right hand bracket is available and costs about $10.00 (Plus S&H). This is far less than the $75.00 sale price of an identical upright vacuum at Wall-mart so was about to place the order this bracket when I double checked which side I needed. Oops, I need the LEFT hand side. And, of course this is no longer in stock and no longer available. I called a couple of local Hoover repair shops and they confirmed that they could no longer get this part.
Not to be deterred, I fired up my table saw, hole saw, and my drill press and within an hour I had a new one fabricated out of a scrap piece of white oak. It's not as pretty or as shinny and red as the plastic original but it should keep us from having to buy a whole new machine -- as well as save the landfill from having to take a perfectly good vacuum cleaner. .
Click on the picture for larger view.
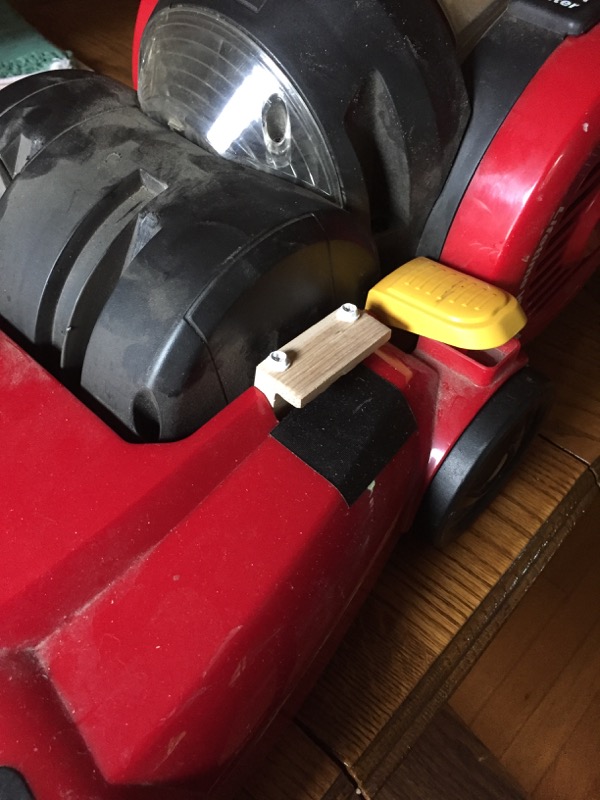
Bracket installed on unit.
This piece fit perfectly and provides all the strength and flexibility of the original. Actually it is much stronger since the original seemed like it was designed to break. Apparently this (planned obsolescence??) engineering has been very effective since Hoover has used up all it's replacements. This model is not that old and it is still available in stores.
As you can see (above) the screws holding the bracket on the original were countersunk all the way down so that only about 1/8" of plastic is holding the whole bracket. On my wooden bracket, the screws are not countersunk at all which provides a whole inch of bracket to support the screws. This is probably excessive, but apparently it's not overkill.
April 2017: Music
Kazoos made from Sumac wood.
A Kazoo -- or a few -- and a use for a box
I really love this Sumac wood. Something about the yellow/green color perhaps. I think it goes nicely with the reddish brown of the Black Walnut.
So I pulled some more pieces off of my woodpile and made these wooden Kazoos. This works nicely because the 'logs' are not very big -- at most 4" in diameter. I've found that you need to split the log in half after cutting green to prevent checking (splitting).
Click on the picture for larger view.

Cutting out block.
The body of the Kazoo is 7/8" square so it can easily be cut from half of a piece of sumac.
I adapted the plans for this Kazoo from the book "Good Clean Fun: Misadventures in Sawdust at Offerman Wood shop" by Nick Offerman.
March 2017: For the birds....
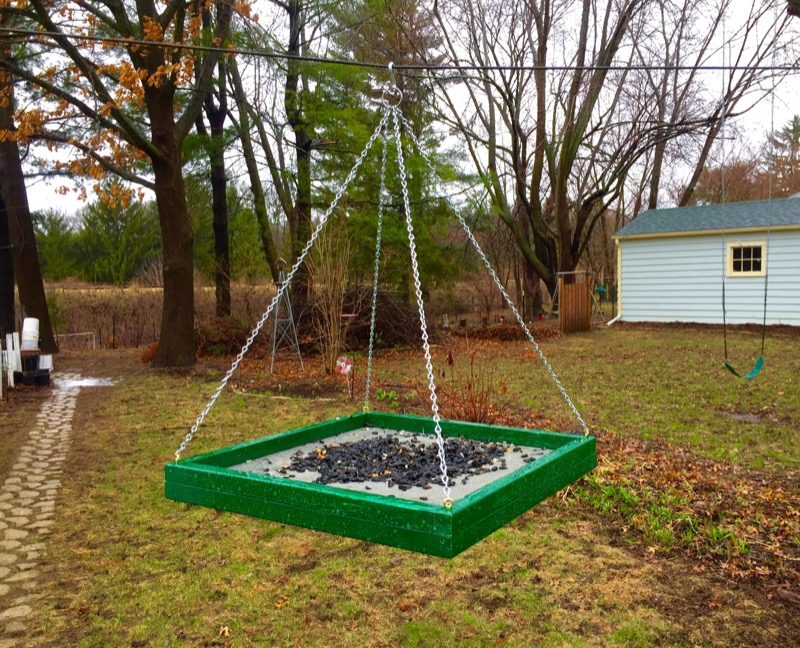
Pyramid bird feeder
A pyramid hanging bird feeder
A couple years ago I made one of these for my sister for her house-warming. It's a simple design and quite easy to put together. It has worked well for her so I wanted to make another.
It's made of 8 equal pieces of 1" X 1", cut anywhere from 10 to 20 inches long. I butt these together into two squares (end to side) so that when the squares are laid on top of each other the joints are staggered.
I sandwiched some aluminum window screen between the two squares and then fasten them together. (I stapled the screen to the top square and then attached the bottom square with screws.
Paint, add eye hooks and chain and it's ready for birds. I thought it might be too shallow but it seems to hold plenty of seed. The water from the rain drains through the screen; which is small enough to hold any seed that I've tried.
I wonder if the pyramid will have any 'pyramid power' type effect on the birds. It may improve their health and well-being. What do you think ?
Parts and finished blue bird house.
I've said that I don't want to be the 'guy' who makes bird houses. But I'd kind of like some blue birds at the farm. They are pretty birds and fun to watch so I decided to build some bluebird houses and see if i can interest anyone in living there.
These are simple to make. It takes one piece of 1 X 6 that's at least 4' long. I cut it up using plans that I downloaded on the Bluebird web site.
I used some old pallet wood I had laying around. It isn't the best wood but I don't think the birds will mind. The roof should be a little larger so it can overhang the front and sides. This protects the nesting birds from heat, rain, and some predators. I used some other old scrap wood for the top.
I assembled the front, back, bottom, and one side with tacks and glue. The other side takes two tacks driven through the front and back, respectively, and into the side at about 3/4 up from the bottom. This allows the side to swing open for cleaning and inspection. This was a tight fit for this door on my houses and the side seated firmly. Even so, I added a latch by drilling a small hole through the front and into the side. The size of the hole was such that a nail would slide easily in and out to latch the door.
Click on the pictures for larger view.
February 2017: Two new projects in wood. (added to Wood Working pages March 2017)

Milking Stools by Stuart
A copy of an old Milking stool and a sliding top box:
When I tore down the old barn at the farm, I found an old milking stool that we used to use when I was growing up. I'm sure my father made this (and all the other stools) and it was the low, simple, sturdy stool that would withstand being thrown out of the way by the person milking (and kicked out of the way by the cow being milked).
I decided to make a copy of this basic stool. I used some wood I had laying around the shop. The main part is from the side of an old water bed from the 80's. When the water beds were no longer fun, I tossed the bladders but I saved the sides since it was nice straight grained Pine or Spruce. I knew I'd find a use for it eventually.
The cross pieces are another kind of pine or spruce from some boards that my neighbor had thrown out (put on the curb) a few years ago. This finishes lighter than the watered wood. I have used no stain on this stool; just 3 coats of clear gloss Polyurethane.
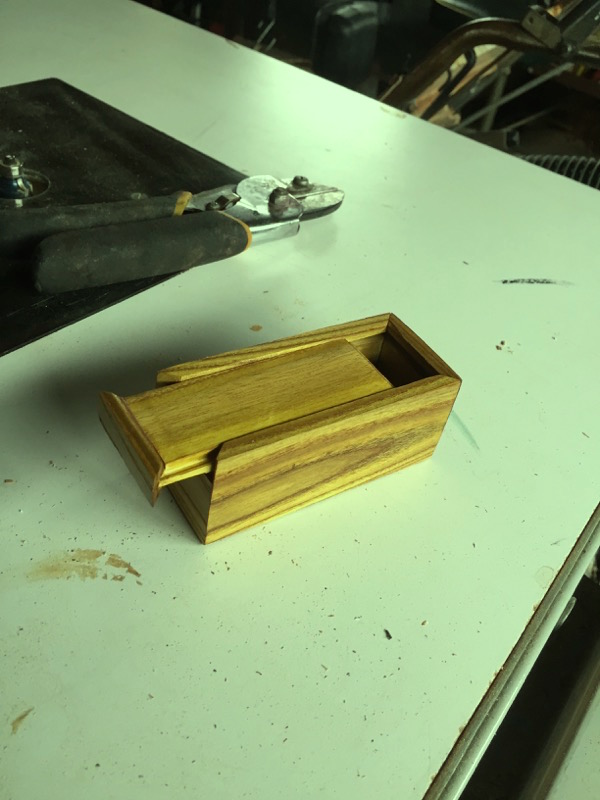
Sliding lid box.
A couple years ago the Railroad cut down all the Red Sumac along the tracks that run behind our house. I ran out that night and 'rescued' all the bigger sections of trunk. (They had just left it there to rot.) I split each piece once and stacked it in my shop to cure.
Now I simply sliced off some boards 1/4" thick and this is my first effort.
I found the idea and some basic instructions on the PBS web site for The Wood-wright's Shop with Roy Underhill. He uses these great old planes that I can't afford, so I had to make some jigs for my table saw. I did this more for safety than anything because it's dangerous working with these small pieces on a big saw. It's hard to keep your fingers at a safe distance from the blade without some sort of jig and/or slide.
This wood has a beautiful green tint to it that doesn't really show in this picture. Unlike the red in Box Elder, this green seems to stay with age. My brother made a nice little cabinet out of Red Sumac many years ago and it's still green.
I finished this box with clear Tung Oil (for a change of pace from Polyurethane.) Just two coats -- for now.
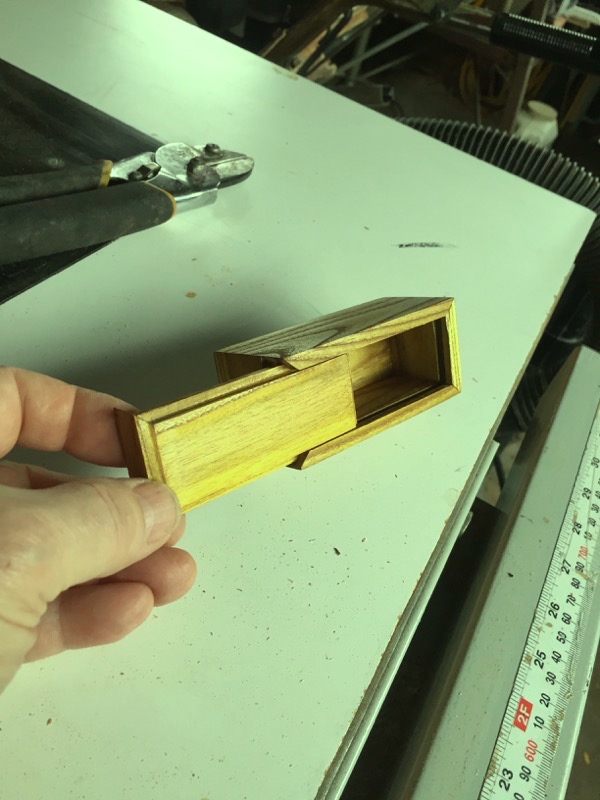
Box made from Red Sumac
Click on the pictures for larger view.
February 2017 Apple Seedlings
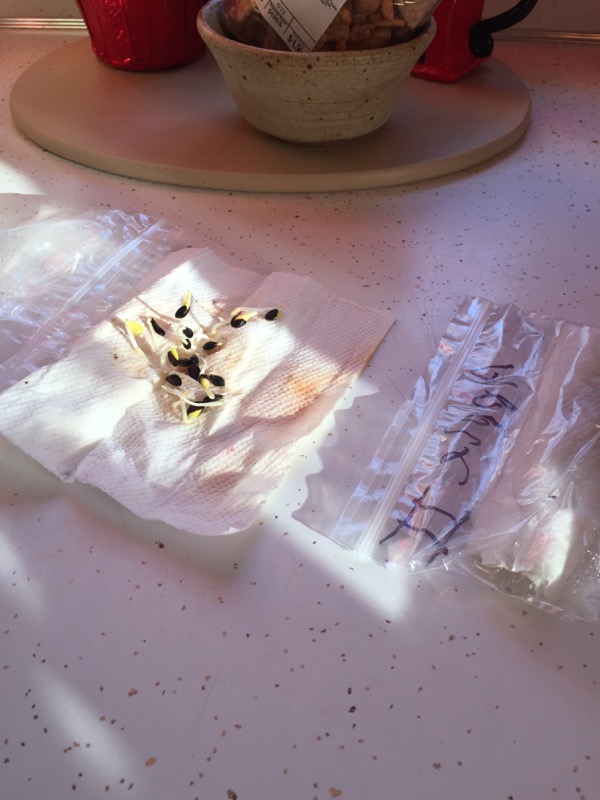
Apple seeds sprouted
after stratification
Apple trees have been part of our family since before I can remember. My parents always had an orchard. Most of my siblings have had orchards both large and small.
Most of these trees were of commercial varieties but many were grown from seed.
( As you probably know all popular/commercial varieties are clones of one original tree of that variety. An apple seed does not produce copy of the apple variety it came out of.
So why plant apple seeds if all the resulting trees will produce terrible (or at least mediocre) apples? Because it's fun to see what you get. And maybe you will get a new variety that is new and different. The odds are probably about the odds of winning the lottery, but still....
One of the trees my Mother grew turned out to be good enough to patent and it is raised in commercial orchards.
Last fall I collected some seed from some apples we picked at a local orchard. I wrapped them in some damp paper towel and sealed them in a baggies. I put this into our refrigerator and this past week I opened it to check for sprouting.
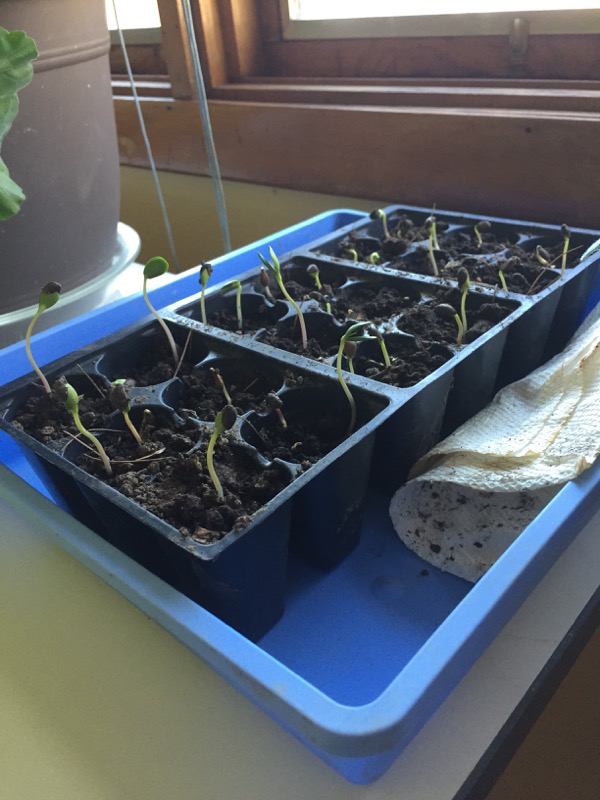
Apple seedlings
Nearly all the seeds had sprouted so I carefully detached each one from the towel and put them in a transplant flat. After about a week they are doing nicely and have fully developed seed leaves.
In the process of re-foresting our farm I have grown 1000's of trees from seed; Oak, Walnut, Maple, Ash, Spruce, Pine, Poplar 'sticks', Honey Locust, Hickory, Buckeye, etc. But never an Apple.
Until now.
This story does NOT have a happy ending - well, sort of.
December 2016 UW Hockey to Basketball arena change over at Kohl Center
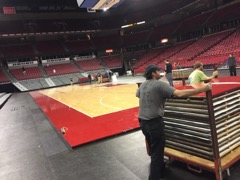
Change-over
Basketball to Hockey
This fall, I was offered a chance to work on the crew that converts the Kohl Center arena from basketball to hockey and back again for the UW teams. I was curious about how this was done so I took the job.
This whole process takes a crew of about 40 people about 3 hours to complete and everyone agrees that it is "good exercise". And yes, I work up a good sweat.
But for me it's more than just good exercize It's been a chance to be a part of a process that's like a well oiled machine. The men and women on this crew move smoothly and surely between all the various steps with the coordination and efficiency of a well rehearsed ballet.
I have been allowed to join this effort a dozen times in the past two months and I am still a novice. Each change-over presents new challenges for me and I learn another part of the process (hopefully, I learn). Mainly I have gotten an appreciation for the work these folks do on a regular basis during the basketball and hockey season. This process is repeated between 45 and 50 times each year.
The only down side for me is that many of these are scheduled to begin at 10:00 PM following either a hockey or a basketball game. This, of course, is past my bed time but I guarantee there is no falling asleep on this job.
Click on the picture for a time-lapse video of this procedure.
Click here for story from On Wisconsin. It is somewhat dated but much of it is still applicable.
November 2016 Added a NEW PAGE titled: "Bat Houses."
Rocket Bat House
Hey, my bat houses actually work.
15 years ago I built a bunch of 4-chamber bat houses and hung them at the farm. I'd pretty much forgotten about them until past fall when I finally verified that bats were actually using them. Since these house are now showing some signs of age, I am inspired to build some new houses.
Check out this new Bat House Page for more detail...
September 2016 additions to the "Moth Man" page.
2016 Season:
"New" Bag strategy
Click on image to enlarge...
-
2016 was an extraordinarily early year for Cecropia moth emergence. My first moth in Madison Wisconsin eclosed on May 27, 2016.
This year was the first year that Kathy in Polk County Wisconsin had a mating pair that produced eggs. She got a bunch and she tried to raise them all. She was more successful than she dreamed and by the time they began to spin she was totally burned out.
My luck wasn't as good. I had a mating pair but I was traveling north to the farm in Polk County when the eggs hatched here in Madison. I'm afraid earwigs got all the young caterpillars. I knew this was a danger so I gave a couple dozen away before I left and took a dozen with me to the farm and put them on trees up there. This left me a little short so I Kathy was kind enough to give me some of hers.

Mesh Laundry BagsNew Bag
Kathy discovered a new system for bagging the caterpillars on the tree branches. She found mesh laundry bags at Walmart for only a couple dollars each (two for $7.77 ). These already have a draw string and there's no sewing required. (my old bags were made out of window screen and had to be sewn into a bag.) I don't know if the mesh is too big to keep out earwigs but these could certainly be used for caterpillars in the second instar onwards; when they're past danger from earwigs.
Please see Moth Man page for a description of the use of mesh (screened) bags for raising caterpillars.
- May 27: First of my Cecropia emerged t- Male.
- May 29: Second and third Cecropia emerged - both Male.
- May 30: First Female.
- May 31: First eggs.
- June 27: Last Moth emerged - female.
- July 31: First caterpillar spins cocoon. (Yes, that's July 31 -- incredible!!)

2016 highlights (from my cocoons located in Madison):
September 2016 additions to the "Foresting the Farm" page.
A Bad Year for Nuts:
Campus Tree Seed Source
Perhaps the late frost, that killed so many apple blossoms in Southern Wisconsin, also hit the Oak trees. Perhaps it's merely an off year in the normal cycle of nature. Or perhaps the oaks are marching to the warming trend that has pushed all other things natural two weeks ahead this season and the squirrels have already harvested the crop. For whatever reason, there are no acorns to gather this year as the students move in for the fall semester. This saves me from the role of "that old guy who picks up acorns".
As I do this each year, I wonder what people think. I try to plan for any questions with things like; "I'm gathering samples for my research on the Acorn Weevil (Saccoglossus kowalevskii) -- the little worms that grow in acorns and bore a perfectly round 1/8" hole in the nut to escape." But in the end, nobody seems the least bit interested in what I'm doing.
Only once, in the 20 years that I have been doing this has anyone stopped to ask why. That was many years ago and it was such a shock that all I could manage to say was; "I'm planting a woods."
<Click on image for larger view >
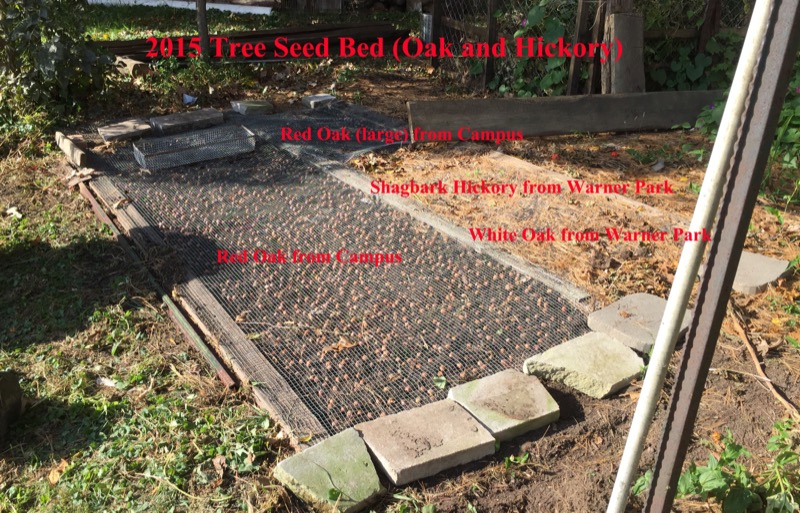
2015 seed bed
Last years crop - where are they now?
Last fall (2015) was such a good year for gathering nuts. I collected Red Oak, White Oak, Shagbark Hickory from campus and Warner Park (close to my house.) I put these in a seed bed in my back yard garden the same as I have successfully done for many years. I lay the nuts on top of good composted soil and covered them with 1/2" mesh screen to keep the squirrels away. But this year I got lazy and did not frame the bed with 2X8 boards. I just lay cedar rails on the ground and stapled the screen to that. The rails were not thick enough to raise the screen above the nuts.
The squirrels defeated this system. They burrowed under the rails to get at the nuts under the screen. They reached through the screen and used their teeth to cut the nuts into small enough pieces that they could pull through the screen to eat.
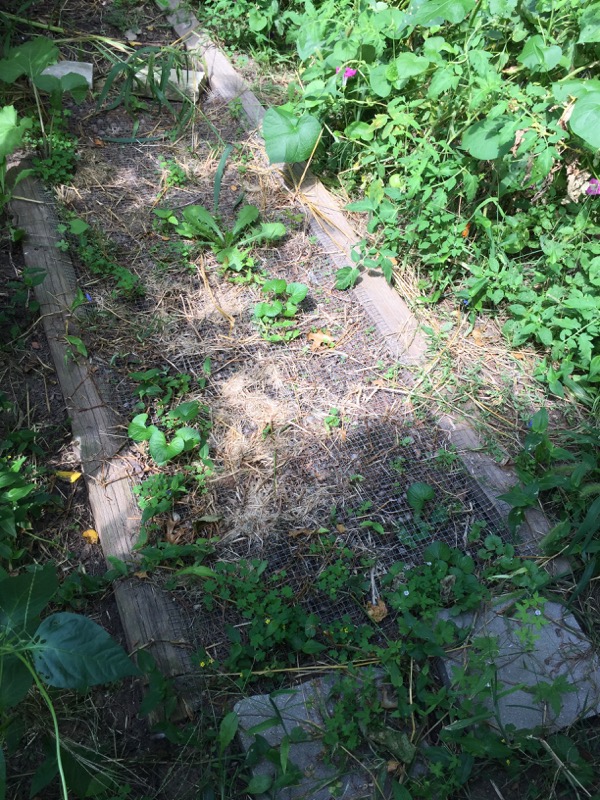
2015 seed bed - after 1 season.
- Lesson (re)learned: The sides of these beds need to be buried a couple inches into the ground to prevent tunneling -- the squirrels will not dig more than an inch down before giving up.. And the screen needs to be supported at least an inch above the nuts to prevent reach through -- but not so high that the sprouting trees will form leaves before the shoots get above the screen. In the past I've had the screen at least 1 inch above the nuts which seems to sufficiently discourage the squirrels.
<Click on image for larger view >
August 2016 additions to the "Foresting the Farm" page.
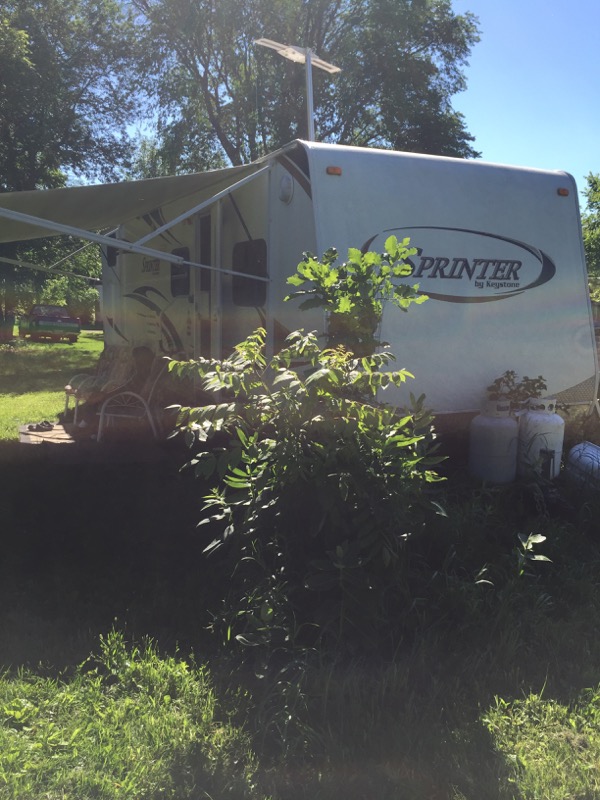
Getting settled
Second summer in travel trailer on farm.
We are spending more time at the farm so I have been paying more attention to the area around the old barn where we have 'temporarily' parked our trailer. We kind of like it here and are reluctant to move it to the site of our original plans.
Trees in Cages.
Part of this effort is to add some trees to the landscape (surprise). I've planted a handful of Oak around the yard and enclosed them in wire fence cages. After three years growth you can see how well they are doing without competition from the deer browse. This success has prompted me to build more cages and begin installing them around seedlings on the rest of the farm (as time and money permits).
Re purposed Corn Crib.
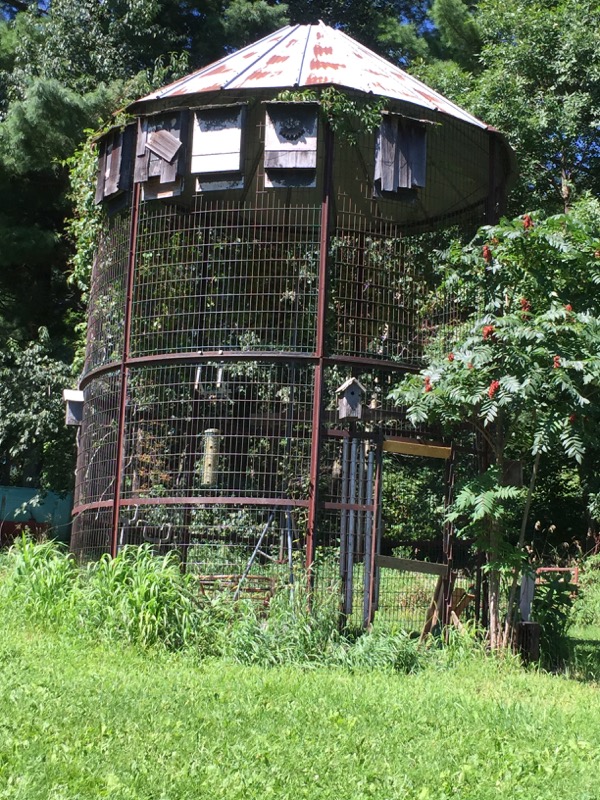
Old Corn Crib.
The Bat Houses:
About 10 yards from the trailer sits an old corn crib. The bat houses on top were installed over 10 years ago and everyone always asks if there are any bats living in them. I could never tell for sure so on the night of August 18th. I decided to watch (like my mother used to do) for them to fly out for the evening. Just at dusk (@8:10), within a 15 minute period, 13 bats flew out of three of the houses. (3, 9, 1 respectively from the far left, center, and far right houses). It was quite a show. They look so big coming out of there. i wanted to cheer.
The Bird Feeder:
In Madison, we spend a lot of time on our deck, watching the birds at the feeders. So this spring I put up an old feeder I found at the farm inside the old corn crib. Everyone up here complains that they can't keep bird feeders because the deer and the bear will tear them down for the seed. I'd like to see either of these animals get inside this corn crib.
Within 2 weeks we started seeing birds (we fill the feeder with black oil sunflower seed (purchased through Endeavors Birders Select program). So far we've had Finches (golden, house, purple), Chickadee, Grosbeak, Downy Woodpecker, Nuthatch (both white and yellow breasted), Cardinal, and even a Pileated Woodpecker. This is a large feeder but it only takes a week for the birds to empty it so whenever we return to the farm the birds seem to be waiting to be fed. The chickadees and finches call to us from the trees and it only takes a few minutes for them to return once the feeder is filled.
Bird Houses:
I built some birdhouse from the barn boards from the old barn. These were occupied by a pair of house finches over the summer. These birds sang the dominant song in the trees for most of the summer but they were all gone by mid-August. I have cleaned these houses and will see what returns in the spring.
Corn Crib:
I cleaned all the trash and old weeds, etc. out of the corn crib exposing a nice concrete floor. I hung some "wind chimes" on the north side and set up the old antennae from the house roof for the birds to perch. I added a hammock for me to nap on and cut some boards for the doorway. This crib is now multipurpose -- with much potential for more....
House and Yard
Farm house in a new light
This spring we received notice that our current tenants would be moving out. We were astonished at how the house and yard had run down over the three years they lived there. I take some responsibility for this because in my preoccupation with the trees, I haven't paid that much attention to the house and yard.
Too many trees too close to house and power lines.
Last fall I contacted a tree service to take down a Box Elder tree that had grown between the house and the power lines feeding the house. Even though it was over the power lines the electric company wouldn't take it down because it was too close to the house and they don't have insurance for such work.
This was a wake up call for me to have to pay someone to cut down a tree. This tree had snuck up on me and in order to prevent that from happening again, I cut down 5 trees south of the house. These were Walnut, basswood, and maple. They had grown so big that the yard below the house was pitch dark even during the day time(and apparently too tempting a place for our renters to throw their garbage). Some of these trees I had to rope so they wouldn't fall on the power lines. Now they are all down safely and I blocked up and stacked the wood and dragged the brush into the lower field to rot.
Now the grass can grow. Now the shrubs can grow. Now the yard is much more warm and inviting. I look forward to planting some perennials and maybe even some annual flowers and vegetables.
Two huge OLD apple trees down
Gone - the last of the old orchard.
My parents planted apple trees wherever they set up housekeeping. As I was growing up much of the area between the house and north to the windbreak was filled with apple trees. Greenings, Macintosh, crabs, and many more. Just north of the driveway there were two Beacon trees. These were great apples that we started eating while they were still small and green and continued eating as they got big and red and sweet. They were crisp and good and probably some of my favorite apples.
When they built the big shed all these trees -- along with Mom's great flower gardens -- had to go. All except for the two Beacons. My mother and brother planted a new orchard on top of the hill to replace these lost trees.
These Beacon trees have grown past their prime. They were too tall to reach all the apples and they produced more apples than they could support. So the apples were small and blighty and not very good to eat. Many branches were dead and the apples fell on the drive way and made a rotten mess. For many years my brother has said; "We should knock down those apple trees." This spring I finally did.
The end of an era passed with no fanfare. This is the only memorial. The removal of the trees has exposed a beautiful rock wall (retaining wall for the big shed) that was buried in the shade from those trees. And the yard is much brighter. I have retained one shoot growing off one of the stumps and a walnut that has planted itself next to the other.
<Click here for more from the woods in 2016...>
<Click here for more from the woods in 2016...>
August 2016 additions to the "Grandpa's Kids" page.
2016 Baker Family Reunion in St. Croix Falls & Centuria, Wisconsin.
.jpg)
Line of Descendents of 10th Child
Descendents of Oscar Roland Baker (the 10th child of Maj. Joseph Stannard Baker). These folks are just a small sampling of the group that attended the 2016 Baker Family Reunion in St. Croix Falls over the weekend of August 3-5.
Every decade - or so - all the descendents of Maj Joseph Stannard Baker gather for a weekend party. These are usually held "out east" but this time the party was brought back to the town where Maj. Baker raised most of his large family -- 10 children -- were born and raised.
<Click on image for larger view >

Poly and Ruth's kids
Ruth and Poly's kids:
All of Maj. Baker's children have passed on by now and this picture contains all of his remaining grand-children (children of his youngest child; Oscar Roland, of whom 6 are still kicking.
Left to right: Stuart, James, Winifred, Roland, Lorna, Daniel. (Natalie passed away 1/1/2001.)
<Click on image for larger view >
The Gallery
Friday the Baker clan gathered at the Baker Orchard in Centuria for games, stories, conversation, and a display of artwork created by those present. I offered to bring some samples of my woodworking and was asked to write a description of each piece which would be used in making labels.
I brought three items: An eight legged stool, a pedestal stand, and a milk stool. I wrote a description of each talking about the origin of the wood and the fact that they were all inspired by my brother Roland's designs. I think these are unique designs and wanted to give credit where it was due (I knew that Roland wouldn't bring any of the originals). And, if you follow this blog you know that I place a great deal of emphasis on the story that goes along with each piece of furniture that I create. "Every Stool has a Story."
So, as I walked through the Gallery I was amazed by the talents of my relatives and then I saw my submissions and the labels on all three read:
Wood
Stuart Baker
I was very disappointed. Silly of me, I know.
June and July 2016 additions to the "Wood Working" page.
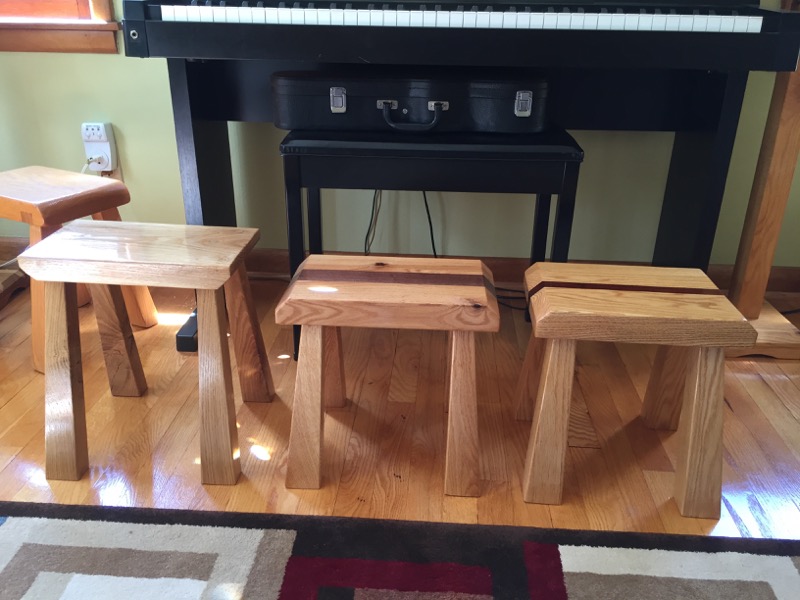
Milking Stools by Stuart
Three Milking Stools after a design by Roland Baker:
This summer I tackled a design that I've been looking at -- literally -- for years.
I built the first out of White Oak. You can see some of the sap wood along the base. I messed up when cutting the bevel for the top and just went with it. I think it gives it a Japanese look. <More>
The second stool is Red Oak and Black Walnut. I was still learning how to join the legs and had to make a few adjustments in the technique. I am continuing to use 'interesting' wood with nice grain patterns and knots when possible. <More>
The third stool was made out of some old Red Oak. This board had been well weathered and was originally slated for garden stakes or something pedestrian like that. After sawing off the outer few millimeters I decided to try using it for a stool. I learned more about how to get the legs right while building this stool. <More>
The Oak for all of these stools came from Polk County, Wisconsin."The Baker Sawmill 54824"
The Walnut for the second two came from my wood pile. These logs were harvested by a tree service somewhere in the Madison area. I noticed how pretty this wood was and rescued it from the furnace.
<Click on image for larger view >

Model Stool and 1st copy
Here is the first stool next to the original that I used for the model.
<Click on image for larger view >
That's all for now. I hope you have enjoyed your visit. -- Stuart
That's all for now. I hope you have enjoyed your visit. -- Stuart